Network Zone Maintenance
- Configuration of CDI Settings for Shared Electronic Collections
- Letters managed in the Network Zone
- Local Authority Headings Workflows
- Creating New NZ Analytics Users
- User Groups in the Network Zone
- How to Activate a CZ Collection in the Network Zone
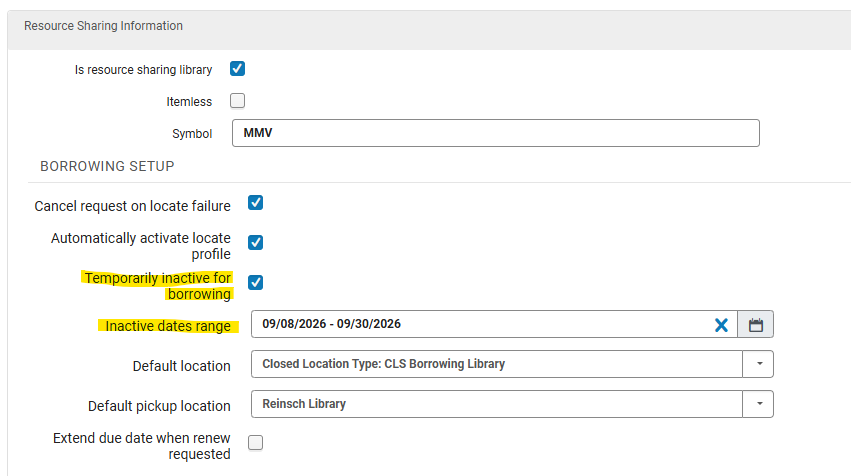
- Temporarily removing partner from CLS
Configuration of CDI Settings for Shared Electronic Collections
CDI settings for electronic collections in the Network Zone are individually configured for each Institution Zone that has access to a specific collection.
CDI Inheritance Parameter
In order for each IZ to inherit the configured CDI settings for NZ shared e-collections, the cdi_consortia_inheritance parameter must be set to Y (for Yes) in the Configuration > Resources > General > Other Settings page.

Notes on CDI
- Full-text activation in Alma consists of two parts : link resolver/link in record for full-text access, and search in CDI (flagged as full-text available)
- All full text collections that are active in Alma will be searchable by default, regardless of what their search activation status is
- You can have search in CDI without full-text links, but you cannot have full-text links without search in CDI unless you suppress it from being flagged as available in CDI
- If a collection is activated for a specific group of IZs, then CDI search is automatically active as well, even if the settings for CDI search activation status are set to No or None
- Full-text suppress means the full-text links (either linkresolver or link-in-record) are activated, but search in CDI is not active, because the resource is suppressed from being flagged as available in CDI.
- Do not show as full-text available in CDI even if active in Alma is the full-text suppress setting
- Can be used only if set on the same level (i.e. for the same groups) as the full-text activation
- This setting is recommended for e-books in order to cut down on duplicate e-book records
- It is recommended to set the We subscribe to only some titles in this collection to Yes for collections with Linkresolver full-text linking; this reduces errors in CDI linking
- CDI-only full text activation appears when Available for CDI search is set to Yes and the full-text linking is Link in Record. For use when your collection is inactive in Alma, you have the option to mark it as "Available Online" only in CDI. (https://knowledge.exlibrisgroup.com/Alma/Product_Documentation/010Alma_Online_Help_(English)/Electronic_Resource_Management/060_Alma_Single_Activation_Source_for_CDI/020Single_Activation_with_the_Fully_Flexible_Setting#The_.E2.80.9CCDI-only_full_text_activation.E2.80.9D_Option)
Resources
- Single Activation with the Fully Flexible Setting
- Single Activation with the Fully Flexible Setting - Consortia
- CDI - Setting CDI Attributes (ODIN)
Current WRLC NZ settings
Collections with Book or Journal linking level and Linkresolver
CDI Tab : for each IZ listed in the Group Settings tab for this particular collection, the settings should be as follows
- CDI Search Activation Status = Active (this setting actually doesn't matter because all full text collections that are active in Alma will be searchable by default, regardless of what their search activation status is)
- We subscribe to only some titles in this collection = Yes
- Do not show as full-text available in CDI even if active in Alma = Check for Yes
Collections with Book or Journal and Link in record
CDI Tab : for each IZ listed in the Group Settings tab for this particular collection, the settings should be as follows
- CDI Search Activation Status = Active (this setting actually doesn't matter because all full text collections that are active in Alma will be searchable by default, regardless of what their search activation status is)
- CDI-only full text activation = Do not check
- We subscribe to only some titles in this collection = No
- Do not show as full-text available in CDI even if active in Alma = Check for Yes
Collections with Article or Issue linking level and Linkresolver
CDI Tab : for each IZ listed in the Group Settings tab for this particular collection, the settings should be as follows
- CDI Search Activation Status = Active (this setting actually doesn't matter because all full text collections that are active in Alma will be searchable by default, regardless of what their search activation status is)
- We subscribe to only some titles in this collection = Yes
- Do not show as full-text available in CDI even if active in Alma = Do not check
Collections with Article or Issue linking level and Link in record
CDI Tab : for each IZ listed in the Group Settings tab for this particular collection, the settings should be as follows
- CDI Search Activation Status = Active (this setting actually doesn't matter because all full text collections that are active in Alma will be searchable by default, regardless of what their search activation status is)
- CDI-only full text activation = Do not check
- We subscribe to only some titles in this collection = No
- Do not show as full-text available in CDI even if active in Alma = Do not check
Database Collections with Link in Record
CDI Tab : for each IZ listed in the Group Settings tab for this particular collection, the settings should be as follows
- CDI Search Activation Status = Active (this setting actually doesn't matter because all full text collections that are active in Alma will be searchable by default, regardless of what their search activation status is)
- CDI-only full text activation = Do not check
- Do not show as full-text available in CDI even if active in Alma = Do not check
Letters managed in the Network Zone
Pull Slip
The Pull Slip is managed for our partners to provide consistency for the displayed location codes. These codes are use to direct the physical items to the patron's selected pickup location.
Notes:
- The SCF's Pull Slip has further modifications to allow the letter to be used for ILLiad physical item requests that come to the SCF via the ILLiad Addon. Currently, only GW is using the ILLiad Addon for this purpose.
- The SCF's Pull Slip has further logic modifications to try to determine if a request created by the SCFapp is of request_type "MOVE_TO_TEMPORARY" or "RESOURCE_
SHARING_PHYSICAL_SHIPMENT". (We are hopeful that Ex Libris will provide this information if/when they update the SCFapp for integration with Rapido(GM).) - The SCF's Pull Slip is not managed in the Network Zone.
'On Hold Shelf' Letter
The On Hold Shelf Letter is managed in the Network Zone so that specific library instructions can be provided to the patron on when and how material can be picked up. The original format of the letter only provided instructions from the owning library. These instruction were not specific to the pickup location that the patron selected.
Local Authority Headings Workflows
The following are the workflows used by the WRLC Consortial Network Zone Manager to oversee, edit, and update the local authority records in the WRLC Network Zone environment.
Replacement Headings
Supplemental Headings
Community Zone Local Headings
-
Write normalization rule with title “WRLC CZ [New Heading] Local LCSH”
-
Create a logical set of all CZ records with the original LCSH
-
Run the normalization rule on the set. Save this as a recurring job (to run every 2 months on the 15th)
-
Consortial NZ Manager will review results of scheduled jobs every 2 months
Documentation
WRLC Local Subject Headings tracking spreadsheet : Replacement and Supplemental Heading Tracking
Testing document : Local Authority Records
Creating New NZ Analytics Users
WRLC staff can fill out the NZ Analytics agreement form (which can be found here) in order to have a user account created for them in WRLC's NZ Alma; this is so that they can access NZ Analytics and create queries and reports.
Once a staff member fills out the form, an email is sent to the relevant WRLC staff. When creating an NZ Alma user account for accessing Analytics, the user account should have the following settings:
- Primary Identifier = work email address
- User group = WRLC Analytics User
- Expiration date = the date given by the staff member on the Google Form; if none is given, set a date for 2 years from now
- Password, Verify Password
- Give them a temporary password
- Checkmark 'Force password change on next login'
- User Roles
- Choose the Add from Profiles button
- Then choose the 'Designs Analytics' profile in order to give the user all of the necessary roles
User Groups in the Network Zone
There are two user groups in the Network Zone Alma.
| User Group | User Group Code | Type | Notes |
| WRLC HQ Staff | wrlchq | Internal | User group for all staff working at WRLC HQ |
| WRLC Analytics User | wrlcanalytics | Internal |
User group for patron accounts created solely for the use of NZ Analytics. For more information, see the Creating New NZ Analytics Users page on the Alma Wiki. |
How to Activate a CZ Collection in the Network Zone
Below are instructions on how to activate a Community Zone (CZ) collection in the Network Zone.
If you are activating a collection that will be used for AUTOHOLDINGS, please follow the instructions given on the Alma Knowledgebase for that particular vendor!
1. Search for the electronic collection in the CZ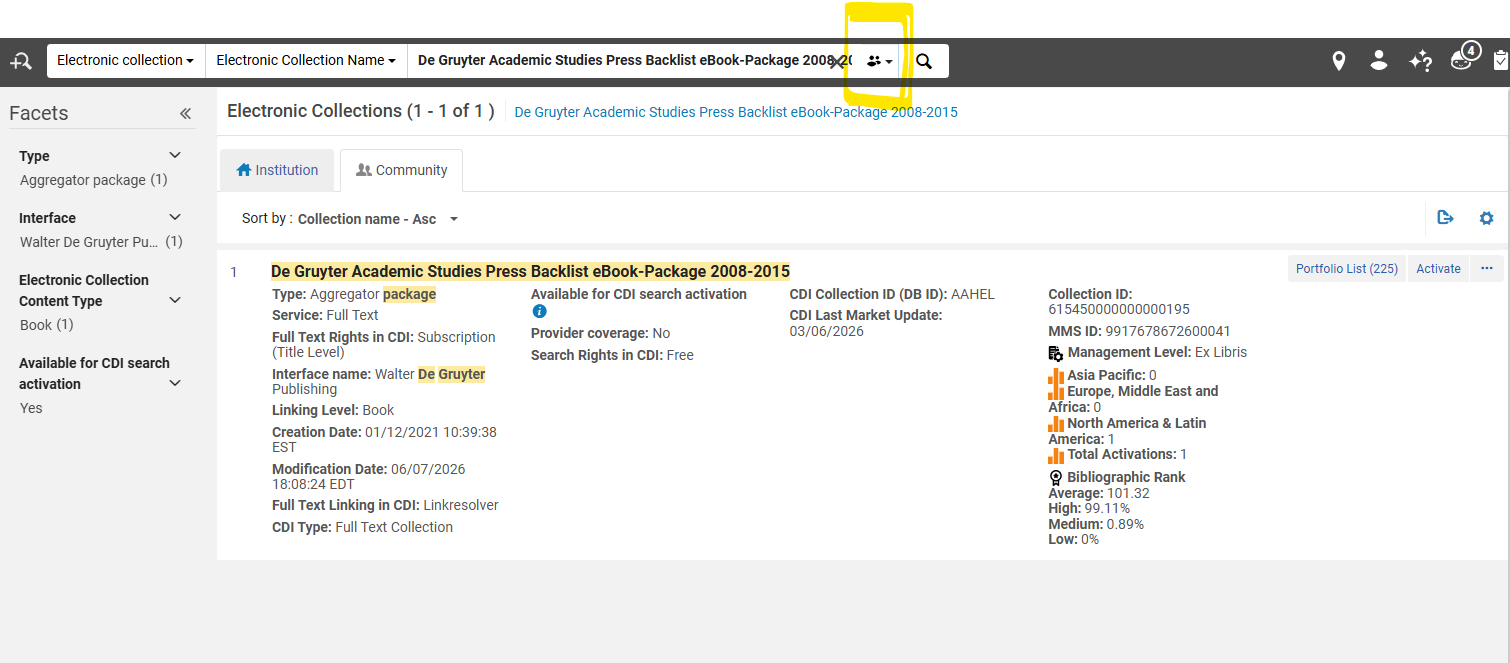
2. Choose the Activate option for the collection.
3. In the Electronic Collection and Services Setup page :
a. Under the Local Electronic Collection Information section
i. Add the Public Name (override) to be the same name as the collection, with '(WRLC)' added at the end of the name. This will help consortial staff identify the collection as a WRLC managed electronic collection.
ii. Checkmark Mark Bib as suppressed. This ensures that the bibliographic record that describes the collection is suppressed from Primo; it does NOT suppress the portfolios attached to the collection.
iii. Electronic Collection Proxy enabled = No. This ensures that a proxy is not added to the URL for the entire electronic collection; it does NOT remove a proxy from the portfolios attached to the collection.

b. Under the Central Discovery Index Information section
i. CD Search activation status = Active
ii. We subscribe to only some titles in this collection = Yes
Please note that the above setting may be changed later, depending on the linking settings of the collection. When first activating a collection, it is safest to set this criteria to 'Yes."
iii. IF collection includes only ebooks, Checkmark Do not show as Full Text available in CDI even if active in Alma.
IF collection includes journals, do not checkmark Do not show as Full Text available in CDI even if active in Alma.

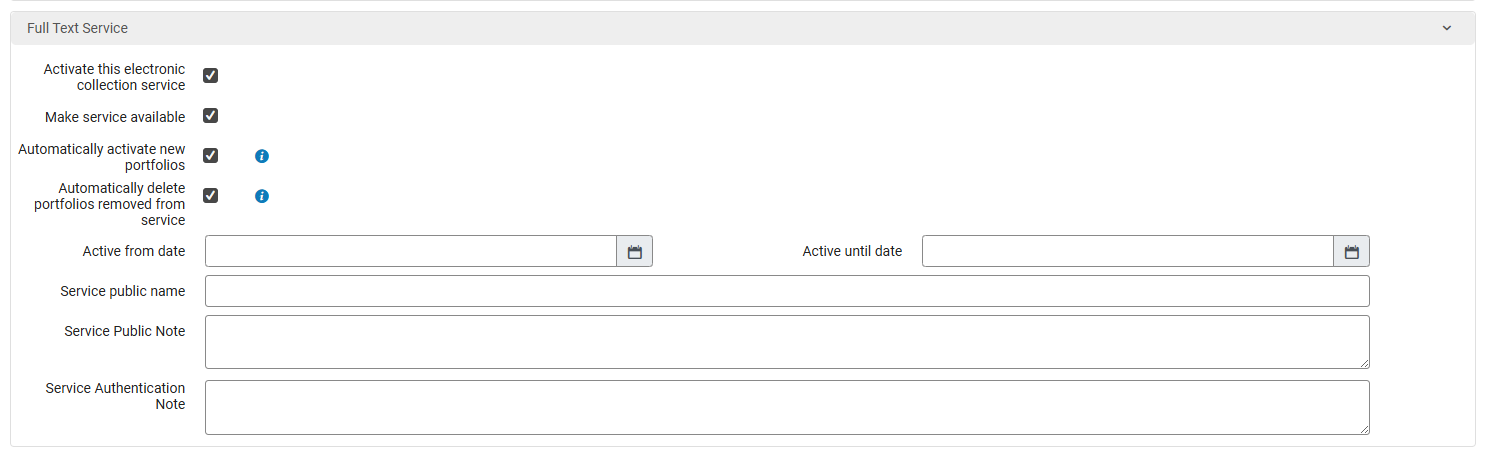
c, Under the Full Text Service section
i. Checkmark the following options
-
-
- Activate this electronic collection service
- Make service available
- Automatically delete portfolios removed from service
-
ii. For the following option...
-
-
- Automatically activate new portfolios : only checkmark if NOT setting up an autoholdings collection, AND if all portfolios in the collection are available through our subscription.
- Automatically activate new portfolios : only checkmark if NOT setting up an autoholdings collection, AND if all portfolios in the collection are available through our subscription.
-
All remaining options can be left blank.
ii. Then click Next.
4. In the Linking Information page :
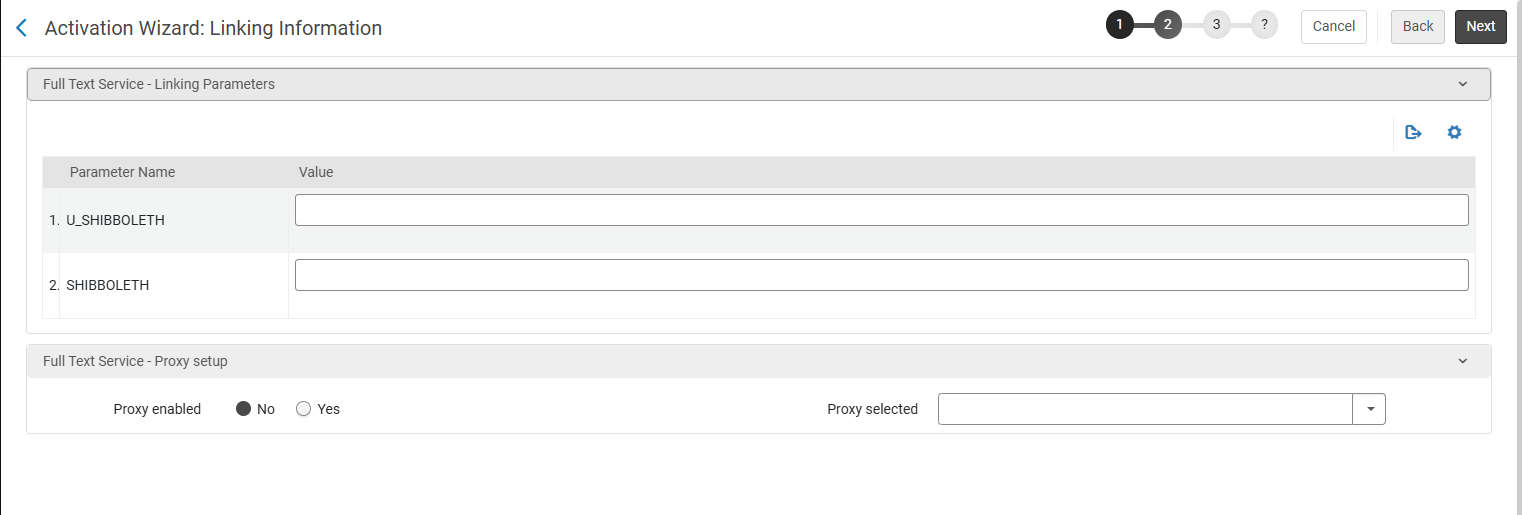
a, Under the Full Text Service - Linking Parameters section
i. Leave all parameters blank
b. Under the Full Text Service - Proxy setup section
i. Proxy enabled = No. If the collection requires a proxy, the proxy settings for each individual Institution will be set later in the workflow.
ii. Then click Next
5. In the Select Activation Method page :
a. Activate all - Activation of the complete electronic collection with no selection of portfolios : choose if all portfolios in the collection are available through our subscription.
b. Manual activation - activate electronic collection and manually select portfolios : choose this option if you are activating a collection that will be used for autoholdings.
b. Then click Next
6. Review the Activation Summary page and make sure everything looks accurate. Click Activate to activate the collection. This will trigger an Activation job to run.
7. At this point, you will be brought back to your original Alma search page. Find the collection you just activated, and click on the house icon to view the same collection in the Network Zone (as opposed to the Community Zone).
8. Click on the ellipsis button, then choose Edit Service
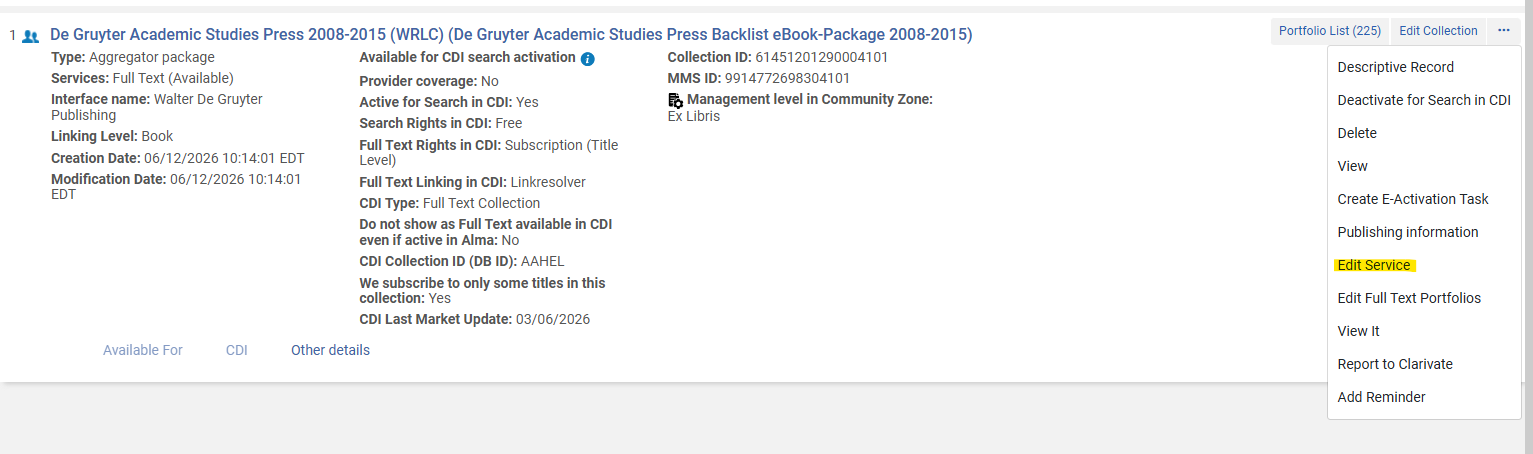
a. Go to the Linking tab
i. Under the General Linking Information section
IF a proxy is necessary for this resource, select Proxy enabled = Yes, then leave the Proxy selected drop down menu blank
IF a proxy is NOT necessary for this resource, leave Proxy enabled = No.
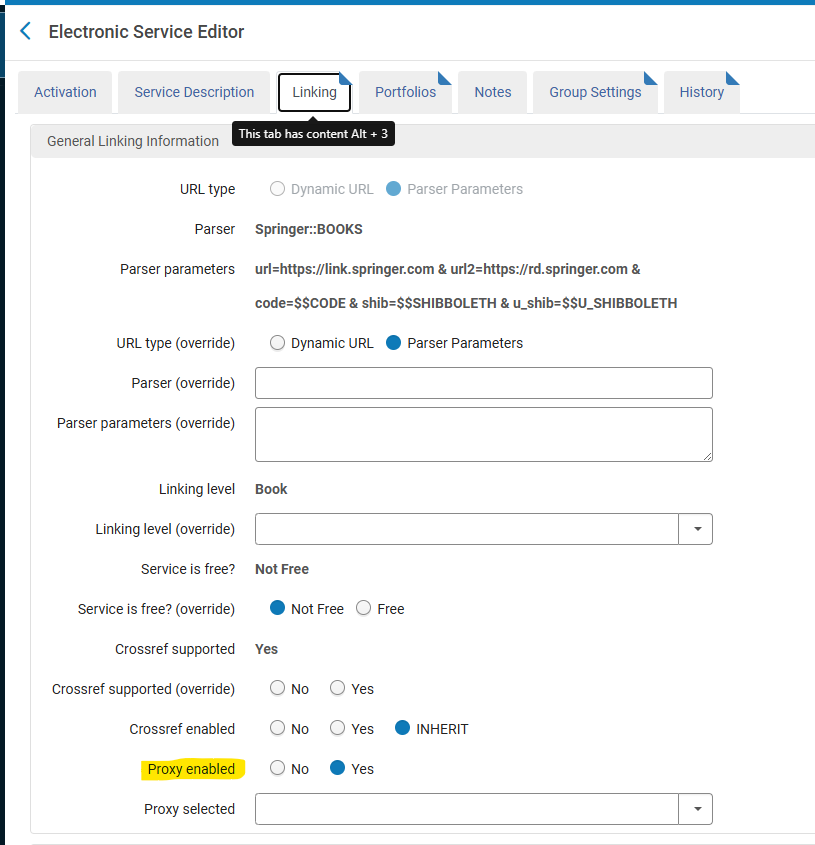
b. Go to the Group Settings tab
i. Click Add Settings For Group to add each institution that has access to the collection.
ii. IF a proxy is necessary for this resource, select Resource Default for the Proxy Enabled configuration
IF a proxy is NOT necessary, select No for the Proxy Enabled configuration;
Do NOT choose Yes for Proxy Enabled. This setting is only for proxies configured in the Network Zone, and WRLC does not configure proxies in our NZ.
iii. Proxy Selected is left blank.
iv. Click Save, and repeat for each institution.
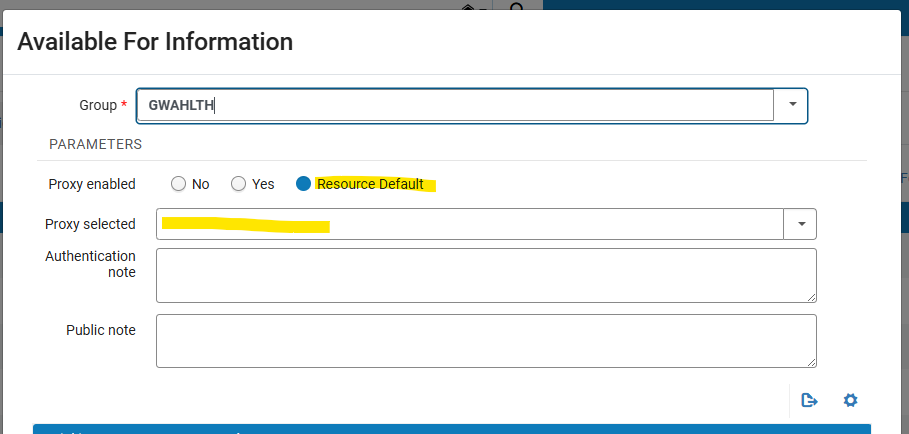
If you choose Proxy Enabled = Resource Default, the settings applied to this institution will be defined by the settings in the Linking tab of the service (what was chosen in step a.i. of these instructions). Proxy settings set at the portfolio and collection levels can also affect whether a proxy is applied; for a full table of Proxy Relationships, please see the Proxy Relationships Alma Knowledgebase page.
v. Once you have configured each Institution, click Save on the Electronic Service Editor page.
Please note that there is also a Group Settings tab in the Edit Collection page; the Electronic Service page is the only one that should be edited for Group Settings.
c. Afterwards, you should be brought back to the Alma search page with a view of the electronic collection.
9. From here, click Edit Collection
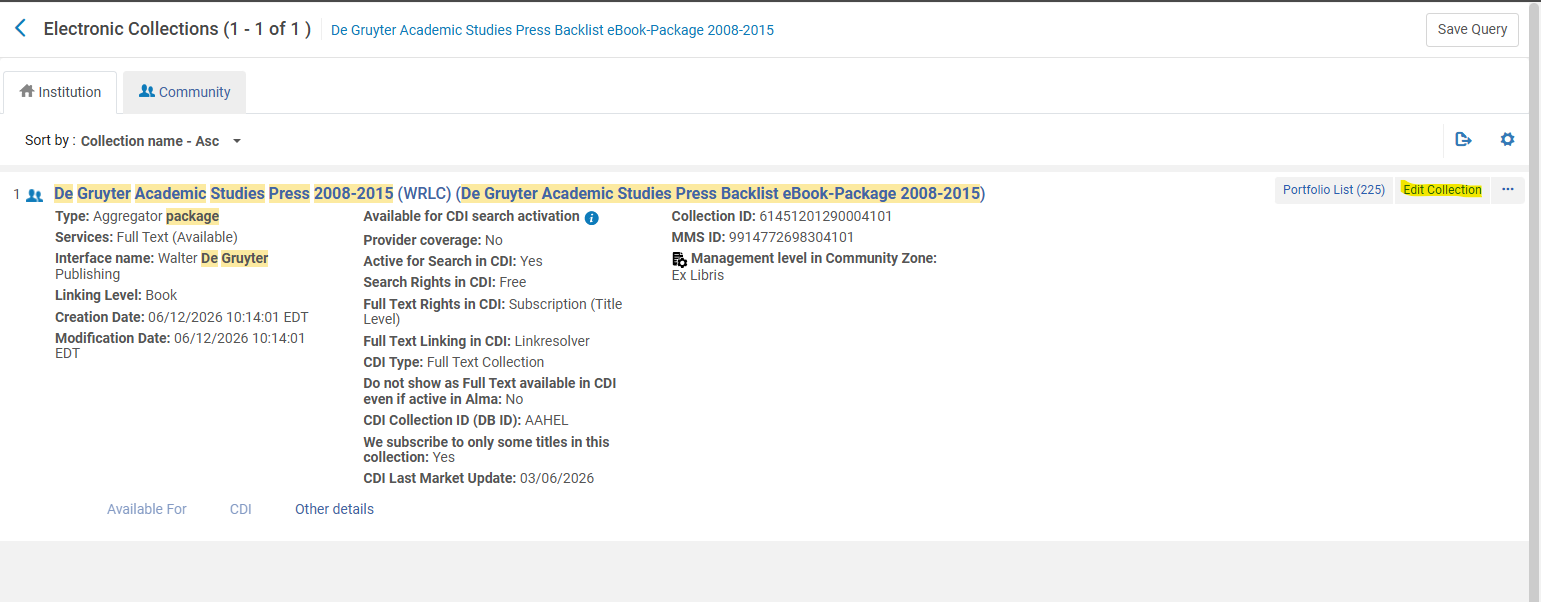
Go to the CDI tab and follow the instructions for setting CDI settings for electronic collections found on the Configuration of CDI Settings for Shared Electronic Collections page on the Alma Wiki.
Temporarily removing partner from CLS
In the case of an emergency, it is possible to temporarily remove a partner Institution Zone from the Consortium Loan Service (CLS) / Automated Fulfillment Network (AFN) rota, in order to prevent their school's items from being requestable.
The following steps are done on the Alma Network Zone.
- Go to Fulfillment > Resource Sharing > Partners
- Find the Institution in the list of partners. Specifically search for Profile Type of Fulfillment Network. Once found, click on the ellipsis button, then Edit
- Under the General Information tab, choose Inactive from the Status drop down menu. Then press Save.

- Then go to Fulfillment > Resource Sharing > Rota Templates
- Click on the ellipsis button, then Edit for the Consortium Book Borrowing rota template
- Go to the Template Members tab
- Find the Institution in the member list, click on the ellipsis button, then choose Remove. Click Save.

- In order to distribute these changes to the Network partners, go to Fulfillment >Advanced Tools - General > Distribute Resource Sharing Network Configuration. When the pop-up appears, click the Confirm button.
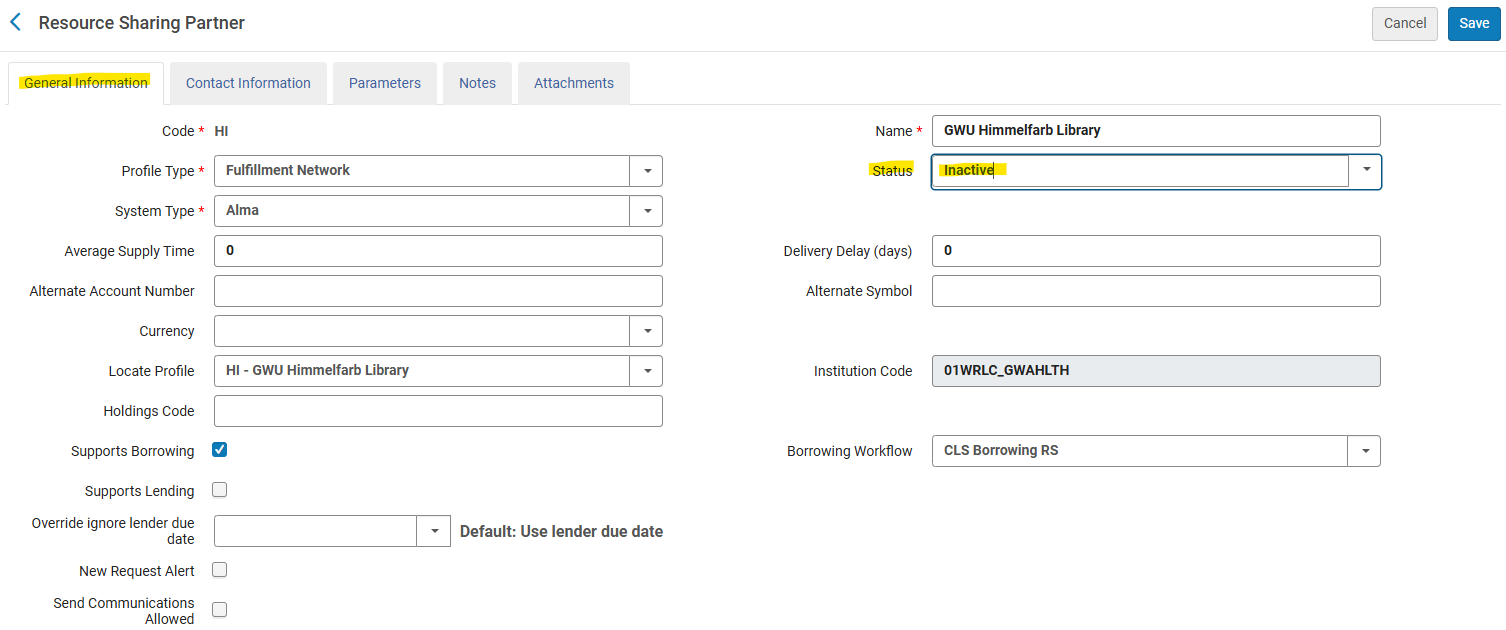
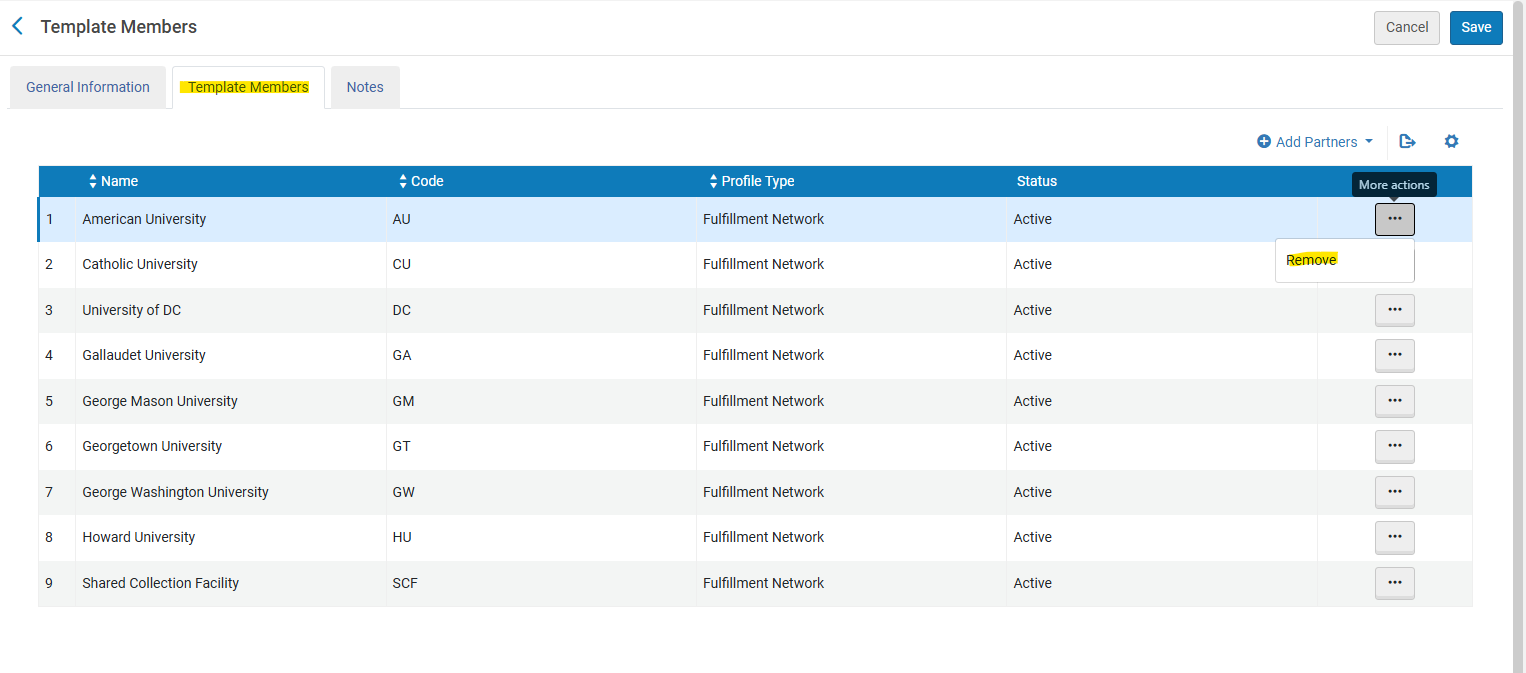
The steps above will successfully prevent the institution's items from being requested by the other consortial partners.
In order to prevent the institution's patrons from placing CLS/AFN requests, one extra step needs to be done in the Institution's Institution Zone.
- Go to their Institution Zone; then go to Configuration > General > Add a Library or Edit a Library
- Go to the Libraries tab. For each library that is a Resource Sharing library, do the following:
- Click on the name of the Library
- In the Resource Sharing section under the Summary tab, check Temporarily inactive for borrowing. If possible, set the dates in which patrons will be unable to borrow consortial items, then click Save.
- Repeat for other resource sharing libraries configured in the Institution Zone.