How to Check an Item In or Out When the Barcode is Missing or Illegible
Circulation Desk staff may occasionally encounter physical materials with missing, damaged, or illegible barcodes during check-in or check-out. Manual lookup ensures continuity of circulation service while maintaining accurate fulfillment statistics. It also prevents delays or incomplete transactions that can disrupt hold queues and overdue calculations.
Required Roles
The options available under the Fulfillment menu are dependent upon your assigned user roles. Your list of options may be different than the screenshots included below. If you do not have the necessary options, you will need to work with your institution's User Administrator to be assigned the appropriate roles for your work.
To complete Fulfillment tasks outlined in this document, you must have one or more of the following roles:
- Circulation Desk Manager
- Circulation Desk Operator
- Circulation Desk Operator - Limited
- Physical Inventory Operator
1: Identify When Manual Lookup Is Needed If the item’s barcode is missing entirely, illegible or damaged, or unresponsive to the barcode scanner- you must look up the item manually instead of scanning. Manually selecting the correct item record prevents misidentification or accidental circulation of similar titles.
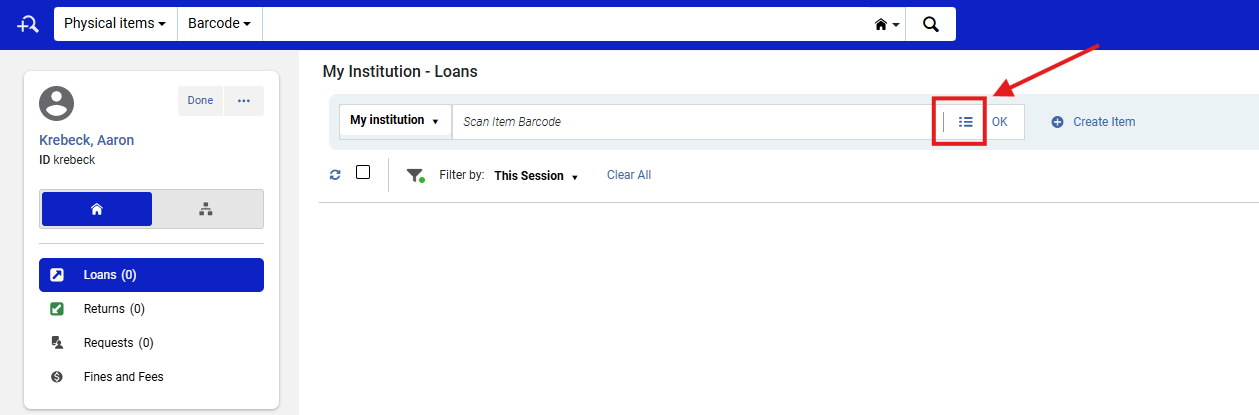
2: Access the Appropriate Fulfillment Screen Navigate to the correct screeen. While the interface differs slightly between these two workflows, the manual item lookup process is identical. Both methods use the <Select from a list> feature next to the <Scan item barcode> field.
- Check In: Fulfillment> Checkout/Checkin> Return Items> Manage Return Items> Select from a list

- Check Out: Fulfillment> Checkout/Checkin> Manage Patron Services> Select from a list
Note: Staff are encouraged to confirm they are in the correct function (Check-In vs. Check-Out) before manually selecting an item. This ensures proper circulation logging and avoids accidental returns or mistaken loans.
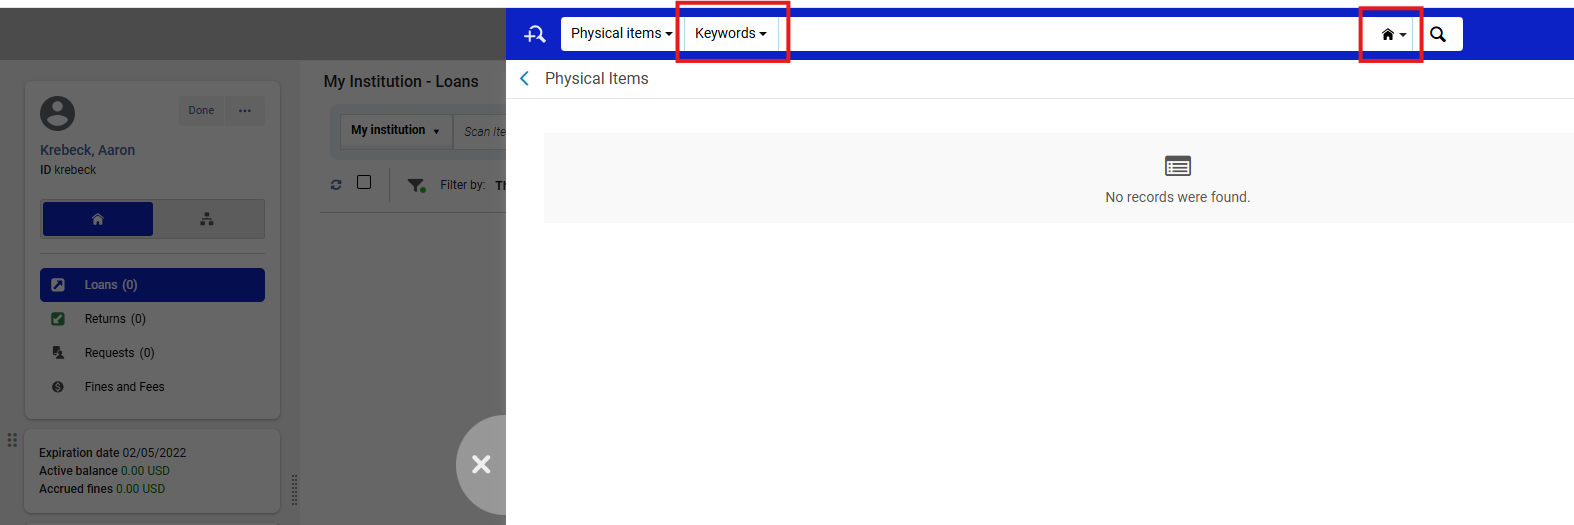
3: Use the <Select from a List> Option Click the <Select from a list> button next to the <Scan item barcode> field. This will allow you to to select from the Choose search index drop-down menu (ex. Keywords) and Choose search scope (ex. institution Zone -- house symbol)
- On the Check-Out screen (Manage Patron Services) the same right-hand side Physical Items panel will open
4: Locate the Correct Item Record Locate your correct item record and select it by clicking the circle to the left of the title and then clicking <Select> in the upper-right to populate the <Scan item barcode> field. Selecting the correct record ensures Alma populates the Scan item barcode field with the appropriate internal item ID. This prevents circulation data mismatches and ensures holds, requests, and Analytics reports remain accurate.
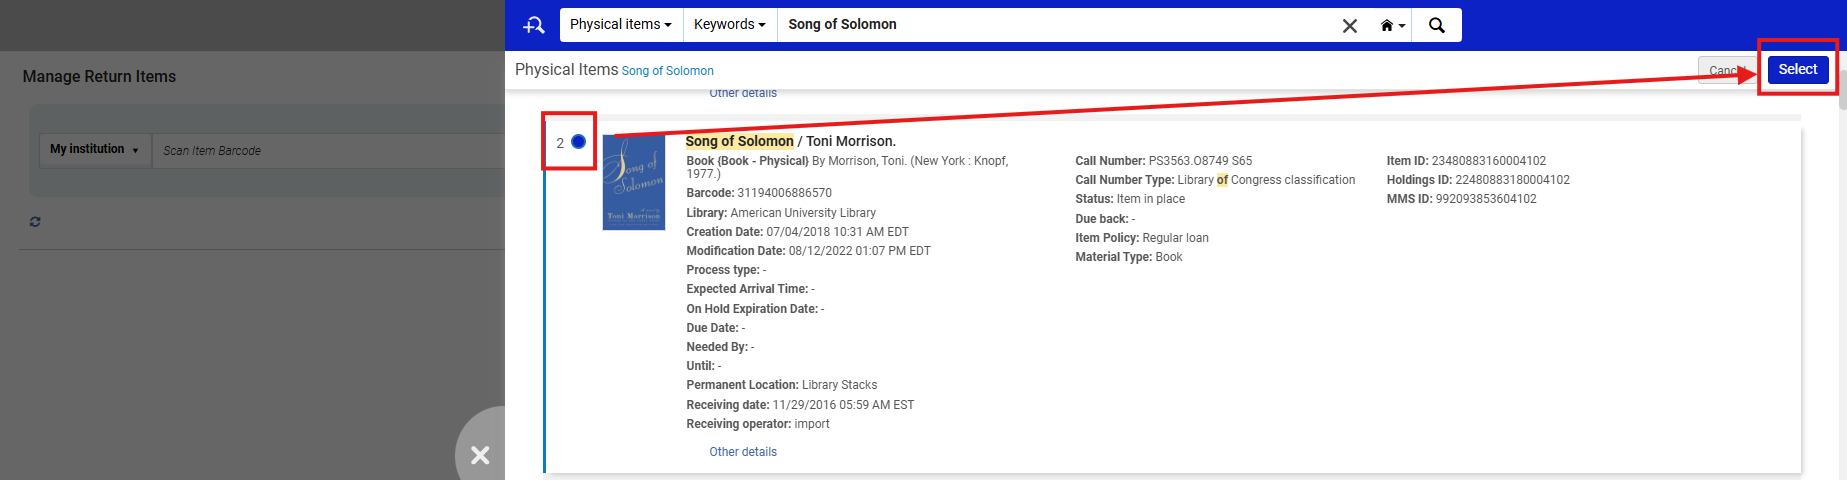
Note: Alma distinguishes item records by MMS ID and Holding ID as well as Barcode. Be careful not to choose a record from another holding or location, particularly for multi-volume sets or shared titles.
5: Confirm and Process the Transaction Once the item record has been selected: Click <OK> to populate the barcode field and complete the Check-In or Check-Out transaction. Clicking <OK> finalizes the operation and ensures the transaction logs under the correct circulation function. Failing to confirm will leave the record open and unprocessed.

Note: The <OK> confirmation both populates and executes the circulation action in one step. There is no secondary confirmation screen, so double-check your patron and item details before clicking.
Frequently Asked Questions
- What if I can’t find the item record in the Physical Items list?
- Confirm the search scope is set to Institution Zone (house symbol) and try alternate indexes (e.g., call number or title keyword). If still missing, the item record may be suppressed or deleted.
- Confirm the search scope is set to Institution Zone (house symbol) and try alternate indexes (e.g., call number or title keyword). If still missing, the item record may be suppressed or deleted.
- What if multiple identical titles appear in search results?
- Verify call number, location, and material type before selecting. Do not guess or assume based on title alone.
- Verify call number, location, and material type before selecting. Do not guess or assume based on title alone.
- Should I create a temporary barcode for immediate circulation?
- Only if your local policy allows it.
- Only if your local policy allows it.
- Will the system remember the manually entered item ID for next time?
- No. Manual selections do not persist; the item must be reselected each time until its barcode is restored.
- No. Manual selections do not persist; the item must be reselected each time until its barcode is restored.