Lost Processes in Alma
- Item's Home Institution: Library Staff Manually Applying Lost Item Status
- Item's Home Institution: Marking Items Claimed Return
- Returning Lost Items
- Renewing Lost Items
- Item's Home Institution: Lost and Paid Status
- Item's Home Institution: Reporting on Lost Items
Item's Home Institution: Library Staff Manually Applying Lost Item Status
This workflow explains how library staff manually mark an item as Lost from a patron’s active loan record in Alma.
When to Reference This Document:
Use this procedure when:
- A patron reports an item as Lost
- An item is significantly overdue and meets local lost-item policy
- Staff determine that recovery is unlikely and financial resolution must begin
- Reconciliation or billing processes require formal lost status
When an item is marked Lost:
- The loan status changes to Lost
- Replacement fees (if configured) are applied
- The patron’s Active Balance updates
- Alma automatically sends the Ful Lost Loan letter
This workflow aligns with standard Alma fulfillment configuration and common consortium policy practice.
Required Roles
- Fulfillment Operator
- Circulation Desk Manager
1: Locate the Patron Record Navigate to Fulfillment > Checkout/Checkin > Manage Patron Services> Search for and open the patron record
Note: The Lost status must be applied to the active loan itself. This step ensures fees and notifications are correctly tied to the borrowing patron.
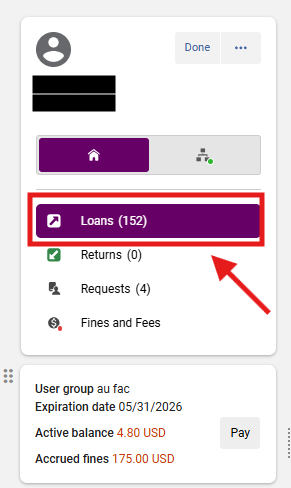
2: Open the Loans Tab Select the <Loans> tab
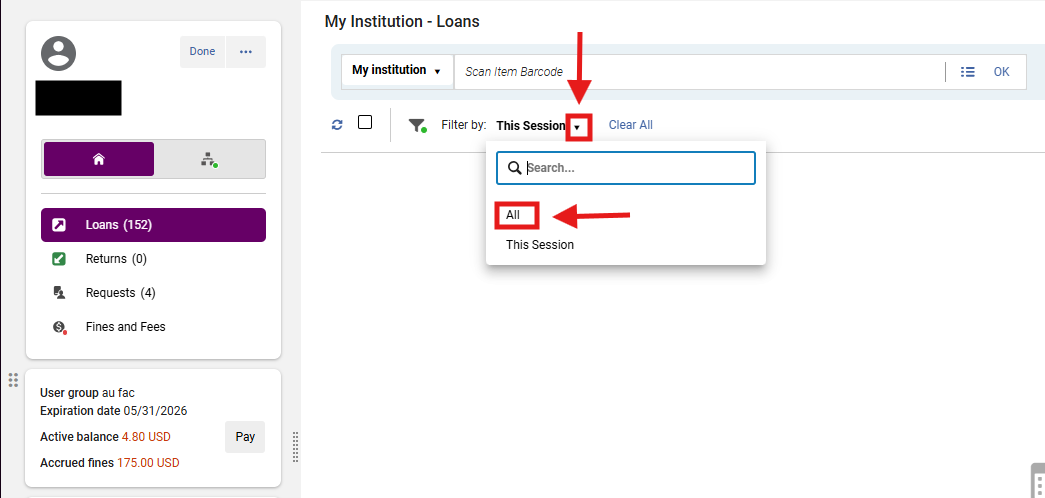
3: Display All Loans In the Loan Display dropdown, select <All>; Locate the item that should be marked Lost
Note: Some items may not appear under “This Session.” Always switch to All Loans to avoid marking the wrong item.
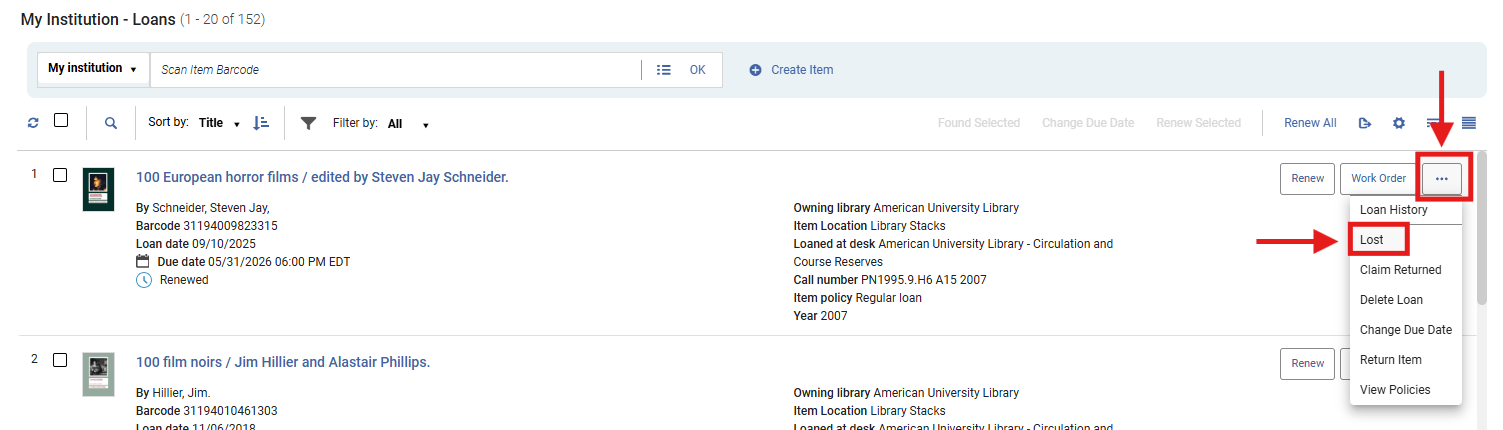
4: Apply Lost Status In the loan row, open the row action menu (⋯); Select <Lost>
5: Confirm the Lost Status The Lost Item dialog box will open and indicate the item's new Lost status and the Lost Item Replacement fee (if configured); Review the fee information and Select <OK>
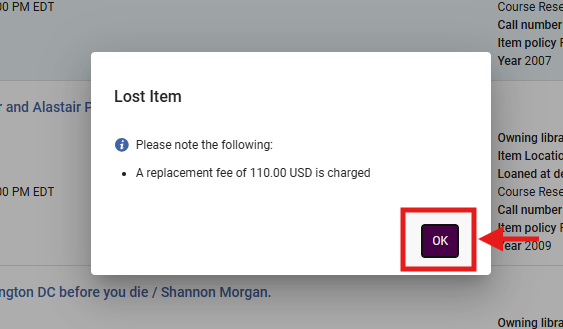
- A green dialog box will also appear from the right hand side of the screen indicating that the item's status has been updated to Lost.
- The Loan record will then update to reflect the associated fines and Lost status:

- The system will:
- Change the loan status to Lost
- Update the patron’s Active Balance
- Trigger the Ful Lost Loan letter
What Happens Automatically
When Lost status is applied:
- The item remains attached to the patron
- Replacement charges are applied (based on local configuration)
- The patron receives notification
- The item is no longer renewable
- The item is removed from standard circulation until resolved
Frequently Asked Questions
- Does marking an item Lost block the patron?
- Not automatically. Blocks depend on your Terms of Use configuration and balance thresholds.
- Can staff override the replacement fee?
- Yes. Fees can be adjusted or waived under the Fines/Fees tab if local policy permits.
- Does Alma always send a notice?
- Yes, if the Ful Lost Loan letter is enabled in configuration.
- What if the wrong item is marked Lost?
- Select <Return> to Discharge the item if returned, or select <Found> to restore the loan manually; Adjust fees as needed.

- Should I use Lost or Claims Returned?
- Use Lost when the patron acknowledges the item is lost or recovery is unlikely.
- Use Claims Returned when the patron states they already returned the item.
Item's Home Institution: Marking Items Claimed Return
This workflow explains how to mark an item as Claimed Returned in Alma when a patron states they have already returned an item, but the system still shows it as on loan.
When to Use this Workflow
-
A patron disputes responsibility for an item
-
An item is believed to have been returned but is not accounted for
-
Staff need to pause billing or escalation while investigating
-
The item cannot be immediately located
When an item is marked as Claimed Returned:
-
The loan remains attached to the patron
-
The item status changes to Claimed Returned
-
Investigation can begin without immediately applying Lost status or replacement fees
Note: This status prevents premature billing and supports fair investigation before determining financial responsibility.
Required Roles
- Fulfillment Operator
- Circulation Desk Manager
1: Locate the Patron Record Navigate to Fulfillment > Checkout/Checkin > Manage Patron Services> Search for and open the patron record
Note: The Lost status must be applied to the active loan itself. This step ensures fees and notifications are correctly tied to the borrowing patron.
2: Open the Loans Tab Select the <Loans> tab
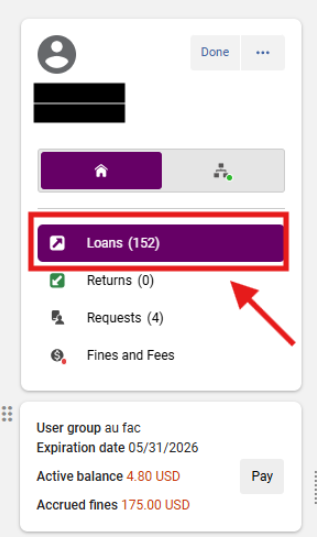
3: Display All Loans In the Loan Display dropdown, select <All>; Locate the item that should be marked Lost
Note: Some items may not appear under <This Session>. Always verify using the full Loan list.

4: Apply Claimed Returned Status Open the row action menu (⋯) for the item; Select <Claimed Return>
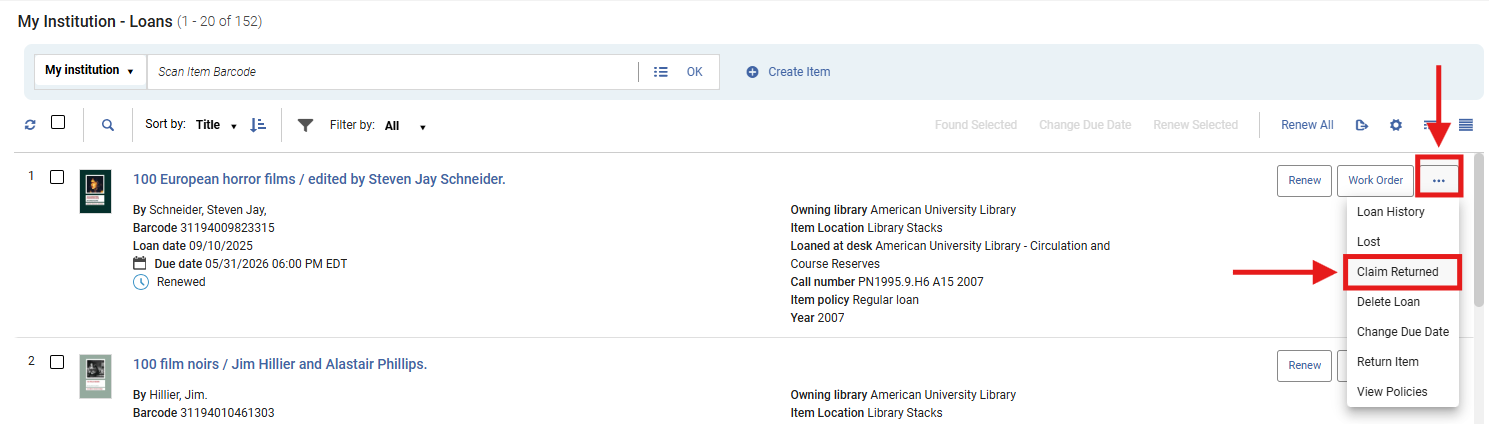
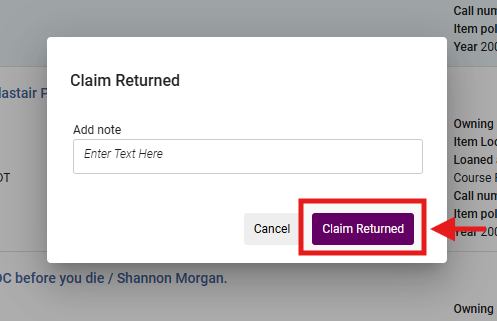
- Optionally, enter a note documenting:
- Patron statement
- Date of claim
- Any relevant context
- Select <Claimed Return>
- A dialog box will appear from the right-hand side of the menu stating, "Loan was successfully declared as claimed returned"
- The item status will update to Claimed Returned

If the Item Is Currently Marked Lost
1: Remove Lost Status First Open the row action menu (⋯); Select <Found Item>
Note: Alma does not allow an item to be both Lost and Claimed Returned. The Lost status must be cleared before applying Claimed Returned.
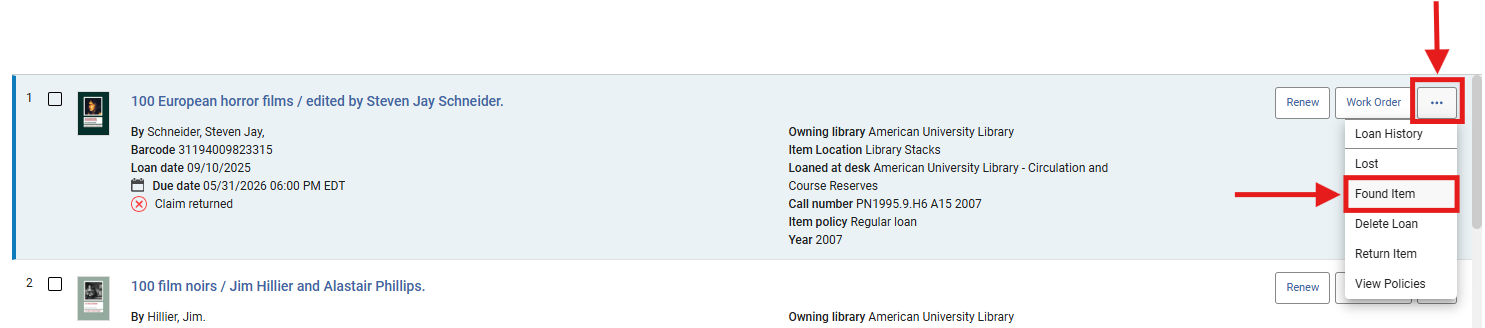
2: Apply Claimed Returned Status Open the row action menu (⋯) again; Select <Claimed Return>
What Happens After Applying Claimed Returned
- The item remains on the patron’s account
- The loan is flagged for investigation
- Automatic lost billing is typically paused (configuration dependent)
- Staff are expected to perform a physical search per their library's in-house policies
Frequently Asked Questions
- What is the difference between Claimed Returned and Lost?
- Claimed Returned = investigation stage
- Lost = final determination with billing
- Does this remove the loan from the patron?
- No. The loan remains active until resolved
- What should I include in the note?
- Date of claim, patron explanation, and any relevant staff observations
- What if the item is later found?
- Simply discharge it using <Return Items>
- What if the item belongs to another consortium library?
- Coordinate with CLS or resource sharing workflows; CLS items can only be marked as Lost within its home IZ
- Can I skip Claimed Returned and mark the item Lost?
- Yes, but be sure to review your library's Claimed Return policies
Returning Lost Items
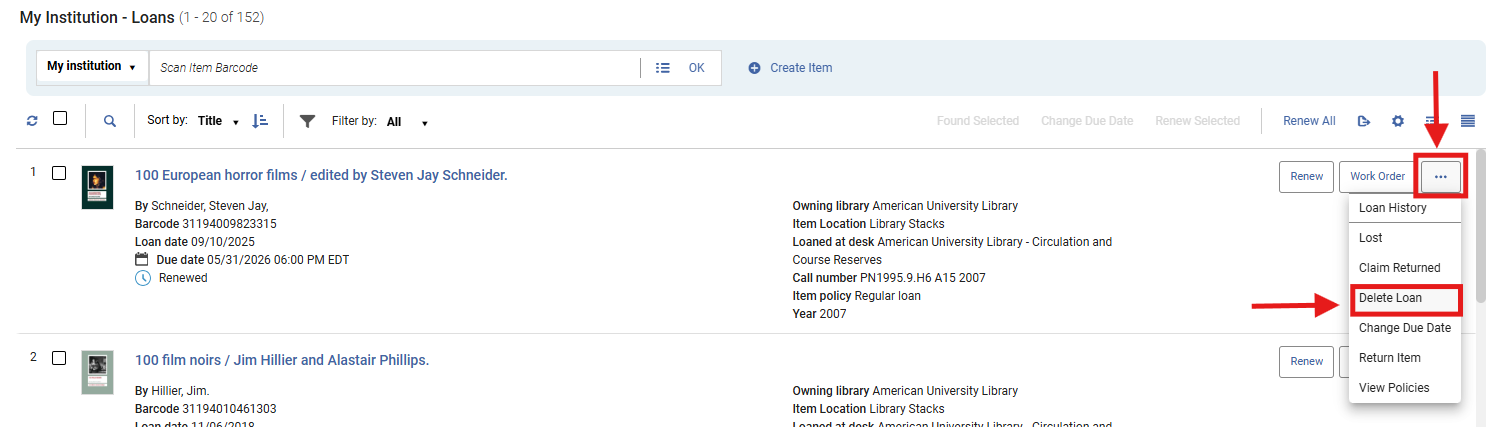
When you receive a Lost item, the best practice is to use Fulfillment> Return Items to return the item.
Alma removes the loan from the patron’s account and deletes the replacement fee for the item. If you delete the loan (as seen in the below image), Alma will change its status to missing, which is not desirable, and will change its status in Alma Analytics to Inactive.
Renewing Lost Items
This workflow explains how to renew an item that is currently in Lost status on a patron’s account in Alma.
Use this workflow when:
- A patron still has the item and needs more time
- Staff determine the item should remain on loan instead of being billed as lost
- The item was manually or automatically changed to Lost, but the loan should continue
Note: In Alma, a loan in Lost status cannot simply be renewed as-is. Staff must first change the item from Lost back to Normal using <Found Item>, and only then renew the loan or change the due date. Ex Libris documents Found Item as the action used to remove Lost status from an active loan in Manage Patron Services.
Required Roles
- Fulfillment Operator
- Circulation Desk Manager
1: Locate the Patron Record Navigate to Fulfillment > Checkout/Checkin > Manage Patron Services> Search for and open the patron record
Note: The Lost status must be applied to the active loan itself. This step ensures fees and notifications are correctly tied to the borrowing patron.
2: Open the Loans Tab Select the <Loans> tab
3: Display All Loans In the Loan Display dropdown, select <All>; Locate the item that should be marked Lost
Note: The item may not appear under a filtered session view. Switching to All ensures you are working with the correct active loan.
4: Remove the Lost Status In the loan row, open the row action menu (⋯); Select <Found Item>
- This changes the item’s loan status from Lost back to Normal.
Note: A lost item cannot be renewed until Lost status is removed. In Alma, Found Item is the correct action for reversing Lost status on an active loan.
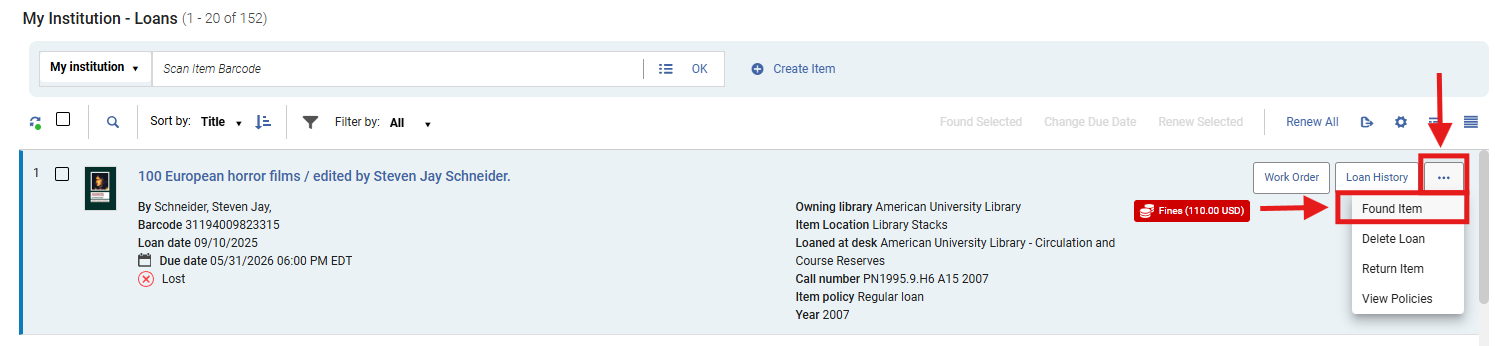
5: System Confirmation Messages After selecting <Found Item>, Alma displays confirmation notifications on the right-hand side of the screen.
- Green (success notification): Loan was successfully declared as found
- Type: Success confirmation
- Meaning: The action completed successfully
- In this case:
- Lost status → successfully removed
- Loan updated
- Blue (informational notification): Lost item check in: 100.0% of 110.00 USD replacement fee will be refunded
- Type: Informational financial notification
- Meaning: A system process occurred (not just status change)
- In this case:
- Refund logic triggered
- Fee adjustment applied
Note: The replacement fees are determined per the Terms of Use configurations
6: Review the Patron’s Charges After using <Found Item>, review the patron’s Active Balance and Fines/Fees tab
If the item became lost in Alma, the replacement charges are typically reversed automatically when the item is marked Found, depending on local configuration. Ex Libris notes that lost-loan refund behavior is configuration-based, including refund ratios and related fee settings.
7: Renew the Loan or Change the Due Date After Lost status is removed: Open the row action menu (⋯) again for the same item
- Choose one of the following:
- <Renew> to apply the normal renewal rules
- <Change due date> to manually set a future due date
Note: Use <Renew> when the loan should follow standard policy. Use <Change due date> when staff need to set a specific exception date.
6: Confirm the Updated Loan Status
- Verify that:
- The item is no longer marked Lost
- The due date has updated correctly
- Any associated fines or fees have been reviewed
Frequently Asked Questions
-
Why can’t I renew the item while it is still marked Lost?
-
Alma treats Lost as a separate loan status. You must first use <Found Item> to return the loan to normal status before renewing. Ex Libris documents Indicating an Item as Found and Renewing Loans as separate actions within Manage Patron Services.
-
-
What is the difference between <Found Item> and <Return Item>?
-
<Found Item> removes the Lost status but keeps the loan active. <Return Item> ends the loan entirely.
-
-
Will Alma always remove the patron’s replacement fee automatically?
-
Not always. Lost-loan refund behavior depends on Fulfillment configuration.
-
-
Should I use <Renew> or <Change due date>?
-
Use <Renew> when standard renewal rules should apply. Use <Change due date> when staff need to set a specific exception date.
-
-
What if the patron still has blocks or other restrictions?
-
Renewal may still fail if Alma detects a patron block or another policy restriction; Renewal behavior is governed by loan rules and blocking preferences.
-
-
Does this apply to automatically lost items too?
-
Yes. Alma changes overdue items to Lost through configured Lost-Loan profiles, and those loans still need to be returned to normal status before ordinary loan actions continue.
-
Item's Home Institution: Lost and Paid Status
This workflow explains how to process a Lost item as Lost and Paid in Alma when a patron has paid the replacement fee, allowing the system to:
-
Remove the item from the patron’s Active Loans
-
Mark the item’s process type as Lost and Paid
-
Resolve the loan without requiring the item to be returned
Use this workflow when:
-
A patron pays for a Lost item and will not be returning it
-
Staff need to finalize the loan and remove it from the patron’s account
-
Replacement costs have been collected and the item is considered permanently lost
Note: Without using the Lost and Paid functionality, items may remain on the patron’s account in Lost status even after payment, leading to confusion and inaccurate loan records.
Required Roles
-
Fulfillment Operator
-
Circulation Desk Manager
1: Locate the Patron Record Navigate to Fulfillment > Checkout/Checkin > Manage Patron Services> Search for and open the patron record
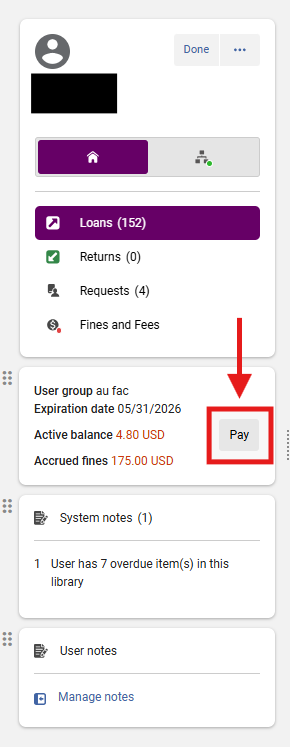
2: Access the Payment Screen Select the <Pay> button next to the Active Balance
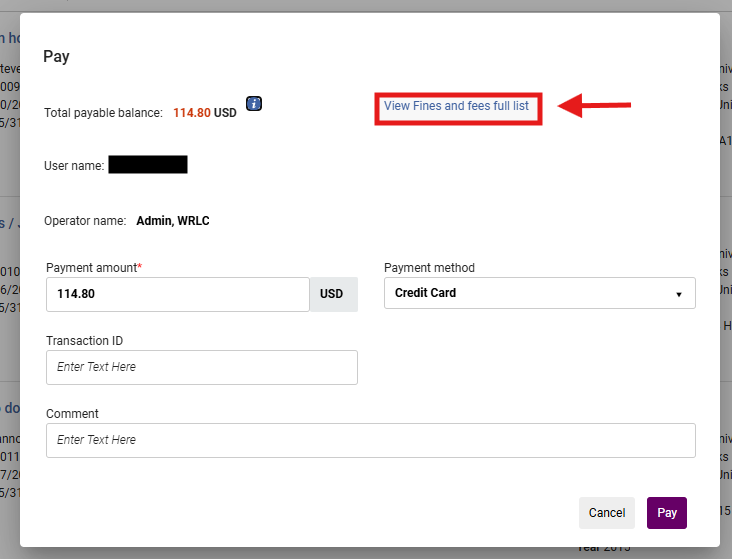
5: Select <View Fines and fees full list> Selecting specific fines ensures that only the intended lost item charge is processed and that other fines are not accidentally paid or altered
6. My Institution - Fines and Fees Locate the Lost item from the resulting list Fines and Fee full list; Select Pay for the specific item you wish to resolve
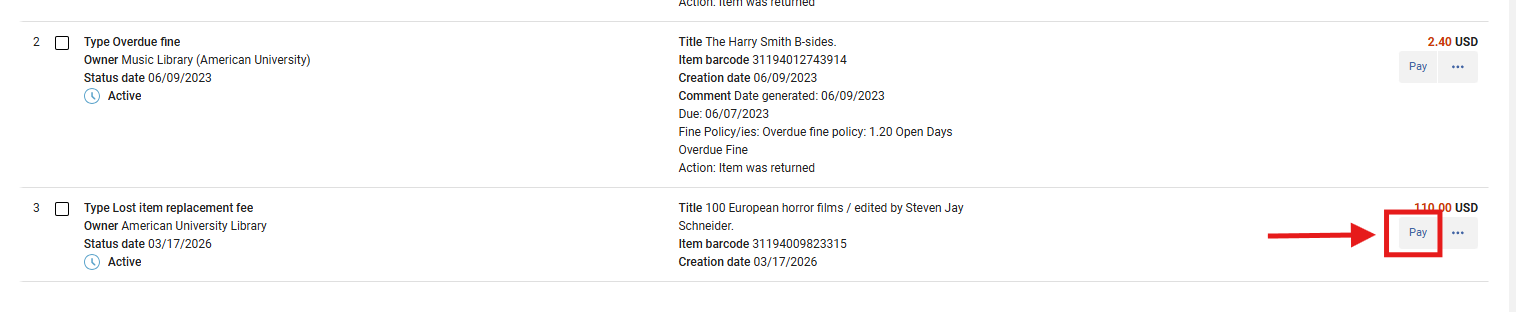
7: Process the Payment
- Confirm that the Lost Replacement Fee is reflecting as expected
- Use the <Payment Method> drop-down menu to select the desired form of payment
- Select the desired form of payment from the available options
- Per your library's policy standards, if required, enter a Transaction ID
- Per your library's policy standards, if required, enter a Comment
- Select <Pay>
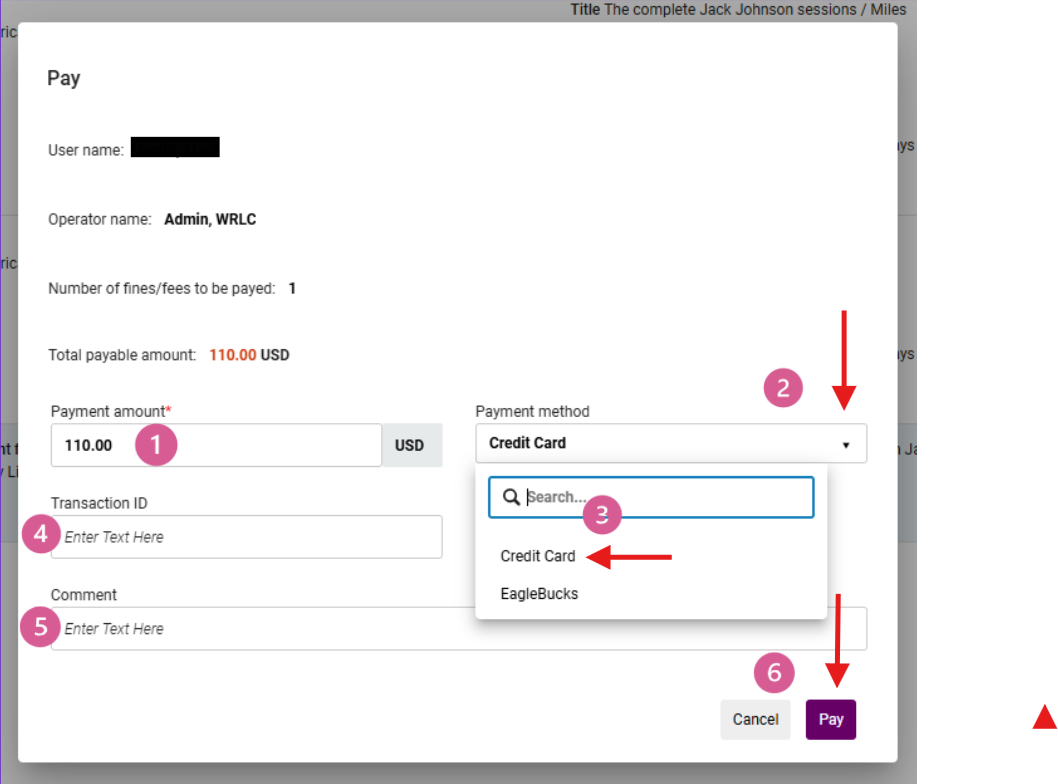
8: Confirm Loan Closure After payment:
-
A display confirmation notification will publish on the right-hand side of the screen with a confirmation note indicating the item has been successfully paid
- The Loan record will update to Paid and the fine amount will reflect a zero balance
-
The item is removed from the patron’s active loans list
-
The item’s process type changes to: Lost and Paid


What Happens Automatically
When configured correctly and applied to Alma-native lost loans:
- The loan is closed
- The item is no longer associated with the patron
- The replacement fee is recorded as paid
- The item remains in a non-circulating lost status
Frequently Asked Questions
-
Why didn’t the item disappear from the patron’s account after payment?
-
The close_paid_lost_loan parameter may not be enabled, or the item may be a migrated lost loan.
-
-
What does “Lost and Paid” mean?
-
The patron has paid for the item, and the loan is closed without requiring return.
-
-
Can the item still be returned later?
-
Yes. If returned, staff may need to:
-
Adjust or refund fees
-
Update item status manually
-
-
0% Lost Item Replacement Fee Refund Ratio
NOTE: To maintain compliance with WRLC Alma Fulfillment Network (AFN) Lending agreed practices, the WRLC FN Lending Terms of Use (TOU) Lost Item Replacement Fee Refund Ratio policy must be configured to 0%.
Configuring this policy to 0% ensures that replacement fees paid for lost items are not automatically converted into patron account credits if the item is later returned in Alma.
Because credits generated from returned Lost and Paid items are treated differently from standard fines and fees in Alma, they cannot always be removed or waived through normal staff workflows. For WRLC FN Lending TOUs, the Lost Item Replacement Fee Refund Ratio policy must therefore remain configured to 0%.
- Item ages into Lost status or is manually updated to Lost by library staff
- Patron pays the replacement fee
- Loan status changes to Lost and Paid
- Patron later returns the item
- Alma evaluates the return against the configured Lost Item Replacement Fee Refund Ratio policy
- Item status changes to Item in Place
- Alma automatically posts a credit/refund to the patron account based on the configured refund ratio policy
If a library has configured the <Lost Item Replacement Fee Refund Ratio> to 100%, then the full Lost Item Replacement Fee Refund will appear as a credit on the patron's account if the item is paid then returned at a later date.
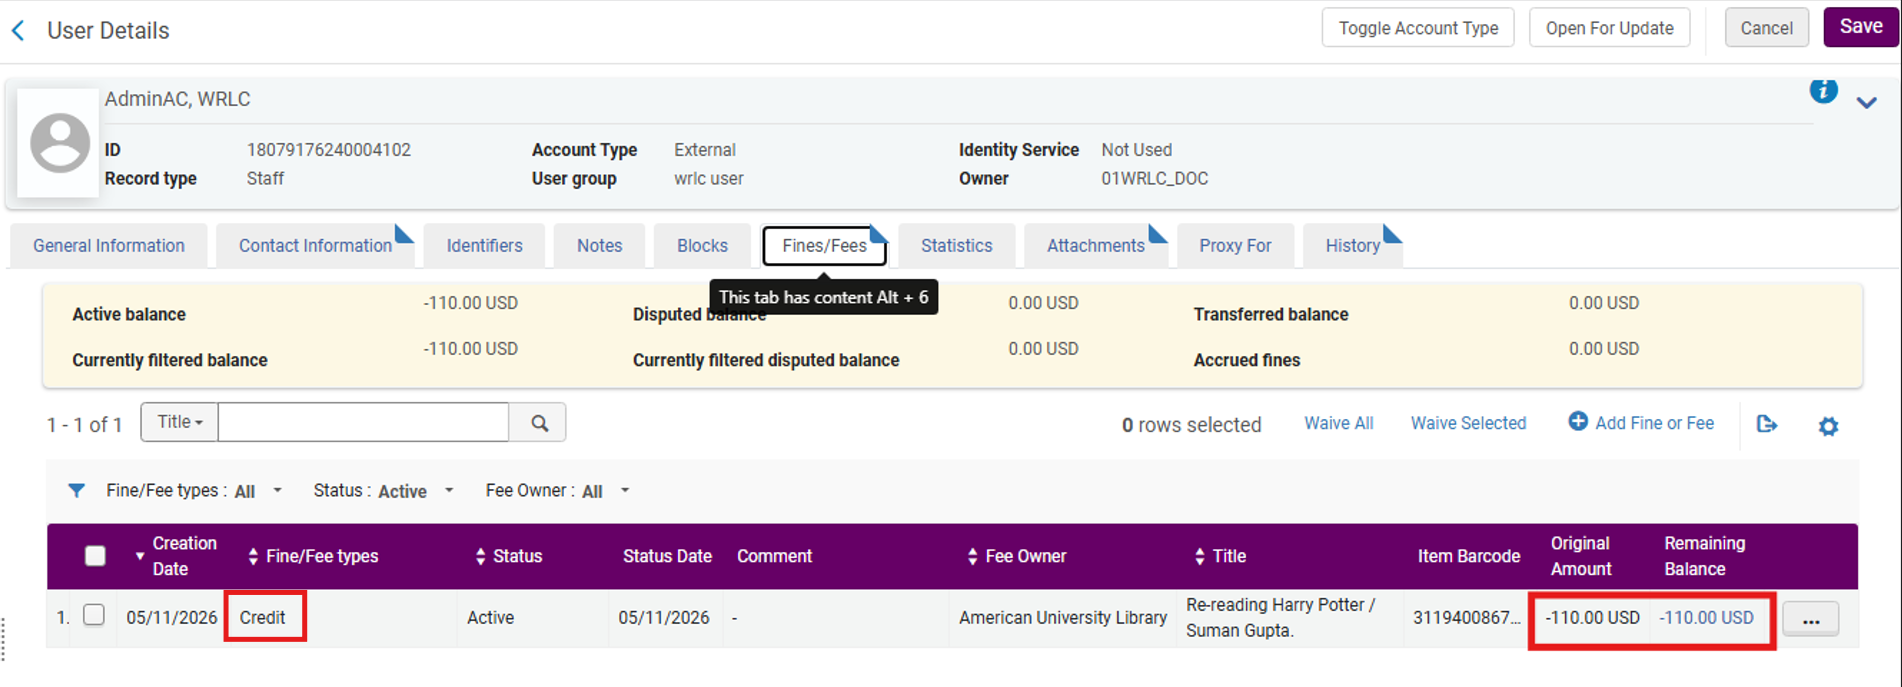
If this is not the desired configuration, then the <Lost Item Replacement Fee Refund Ratio> should be configured to a zero amount.
Configure Refund Ratio from 100% to 0%
- Set <Terms of Use Type> to Loan
- Locate the desired TOU (for example: WRLC FN Lending)
- From the row action menu, select Edit
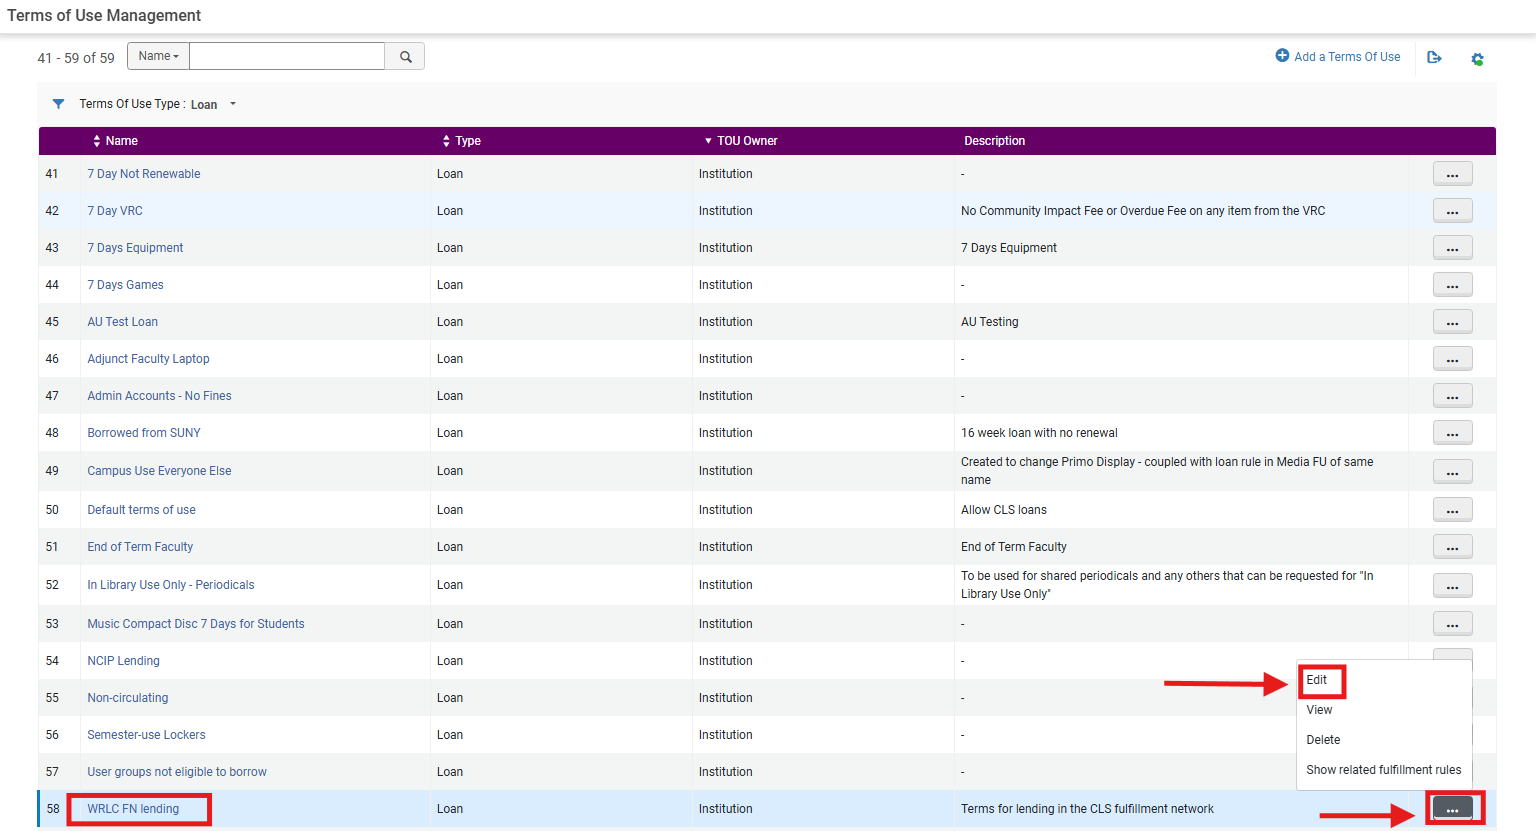
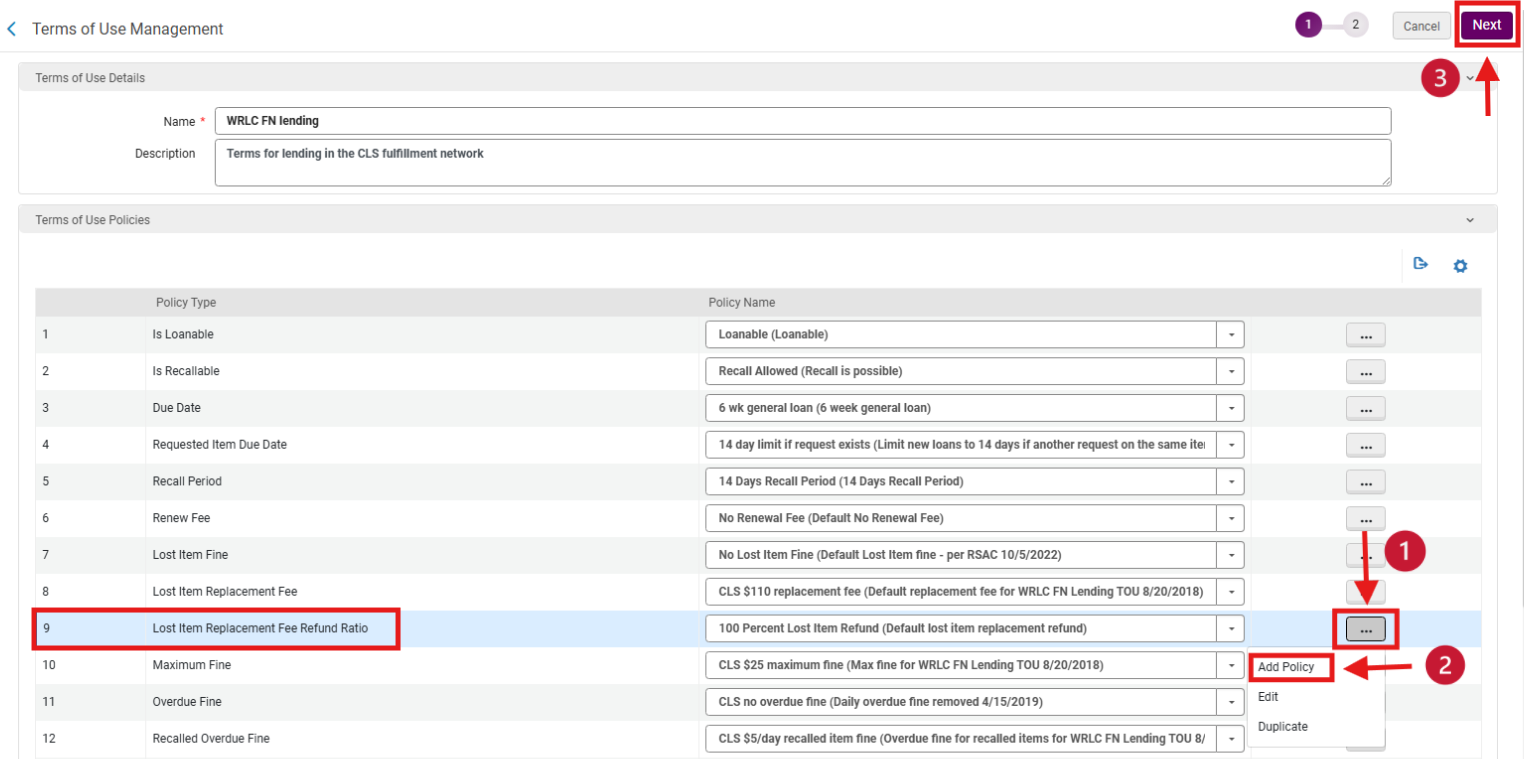
2. Add a new Lost Item Replacement Fee Refund Ratio policy, from the <Terms of Use Policies> menu:
- Locate Policy Type: <Lost Item Replacement Fee Refund Ratio>
- From the action row drop-down menu, select Add Policy
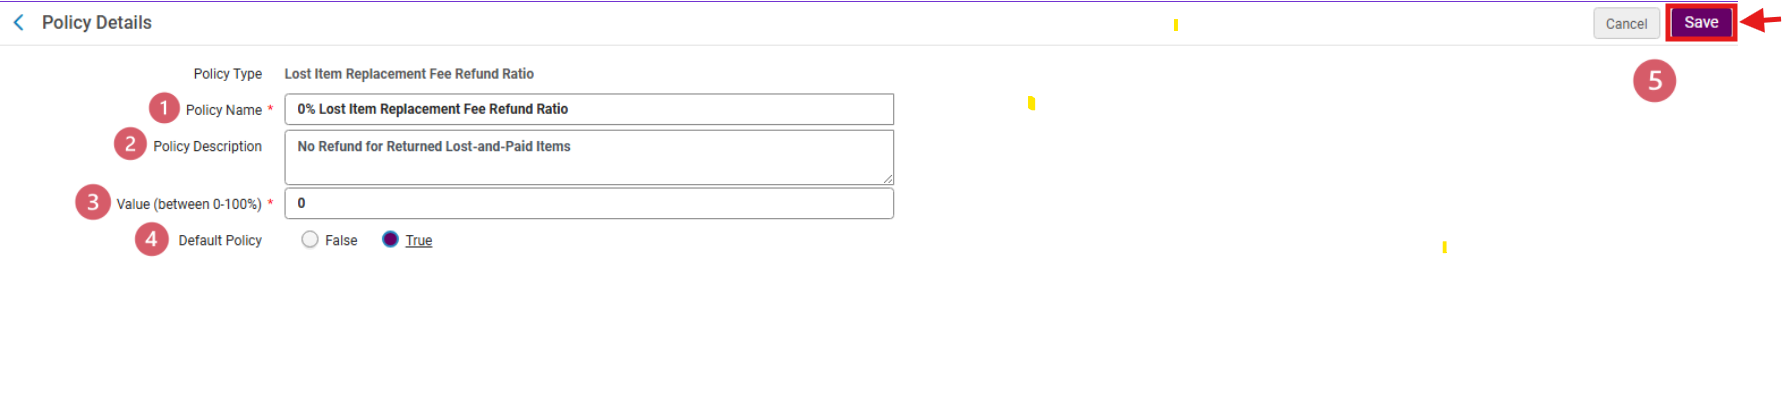
3. Configure the new policy, on the <Policy Details> page:
- Enter new Policy Name <0% Lost Item Replacement Fee Refund Ratio>
- Enter a Policy Description if desired
- In the <Value (between 0-100%)> field enter 0
- If appropriate to library policy, set <Default Policy> = True
- Select Save
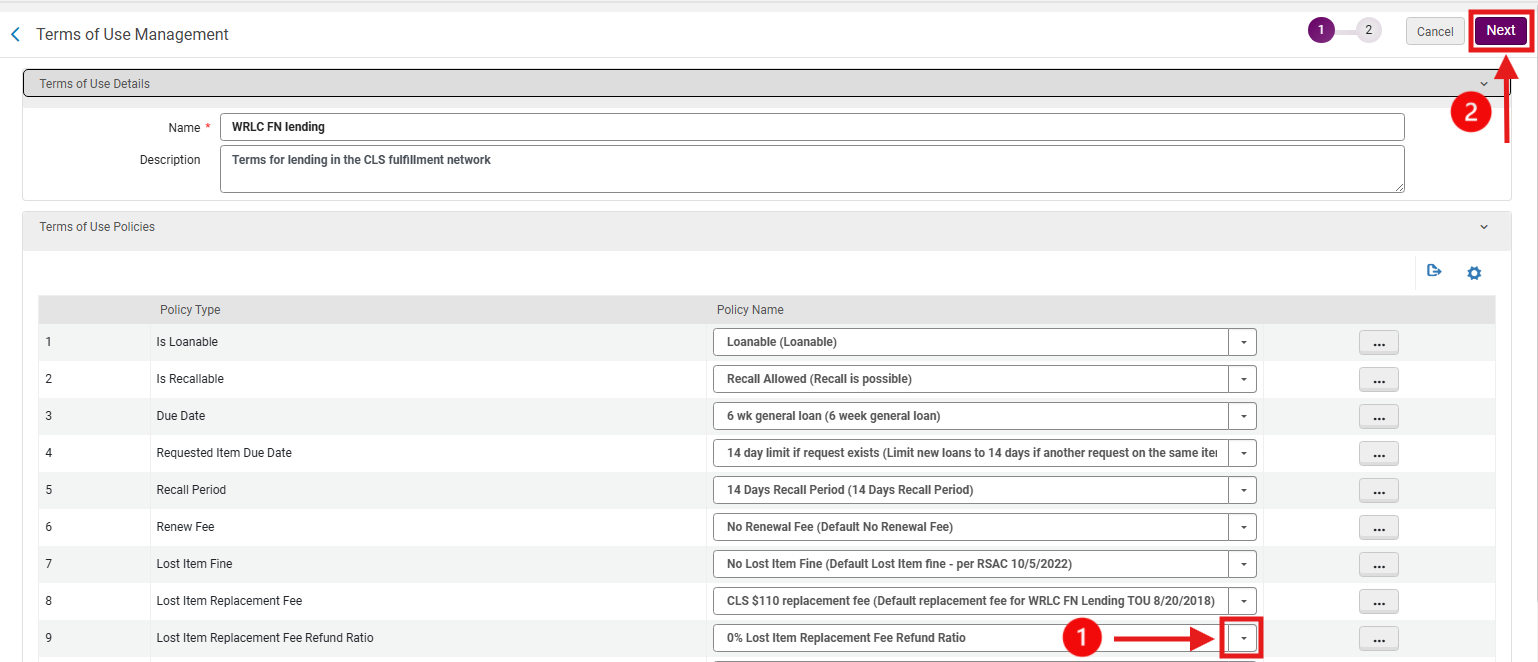
4. Apply the new policy using the Policy Name drop-down menu, select the newly configured<0% Lost Item Replacement Fee Refund Ratio>; select Next
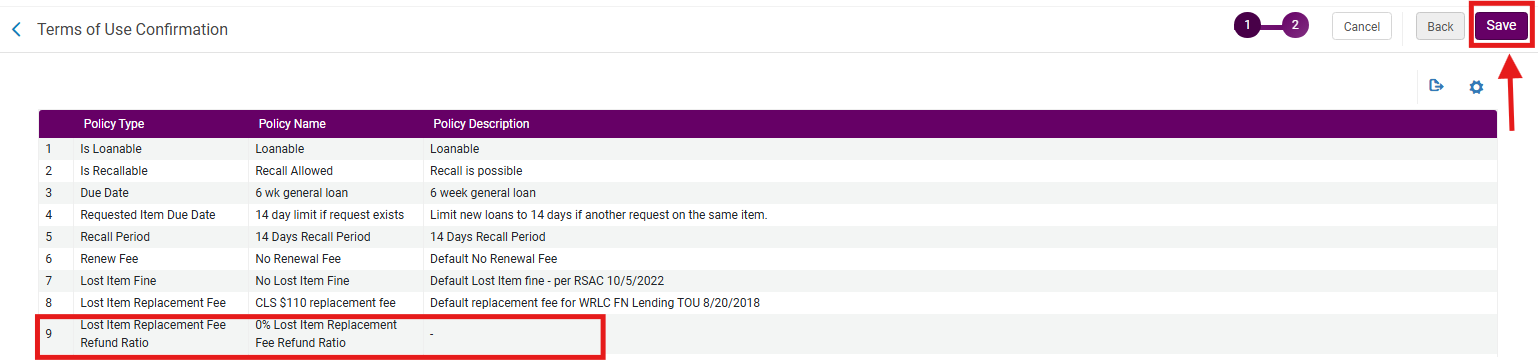
5. Save the updated Terms of Use on the Terms of Use Confirmation page, confirm that the <Lost Item Replacement Fee Refund Ratio> policy has been updated; select Save
Item's Home Institution: Reporting on Lost Items
This workflow explains how to:
- Search for items in Alma that are currently marked as <Lost>
- Review the Found Lost Items Report to identify items that have been returned and had their associated fees automatically adjusted
Use this workflow when:
- Monitoring lost materials in your local collection
- Supporting billing, reconciliation, or audit processes
- Identifying items that have been returned after being declared lost
- Coordinating with bursar or financial systems to ensure accurate fee removal
Required Roles
-
Fulfillment Operator
-
Circulation Desk Manager
-
Access Services Manager
PART A: Searching for Items Marked as <Lost>
1: Open Advanced Search Select the <Advanced Search> link in Alma

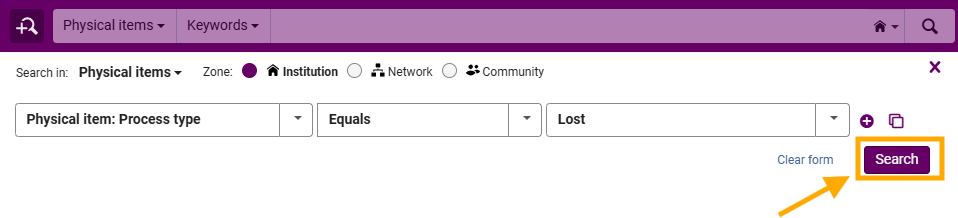
3: Apply Process Type Filter
- In the search criteria:
- Select <Physical Item: Process Type>
- Set the operator to <Equals>
- Select <Lost>
4: Run the Search Click <Search>
5: Review Results The results list will display all items currently marked as Lost
- Review item details as needed, including:
- Location
- Barcode
- Associated patron (via loan record)
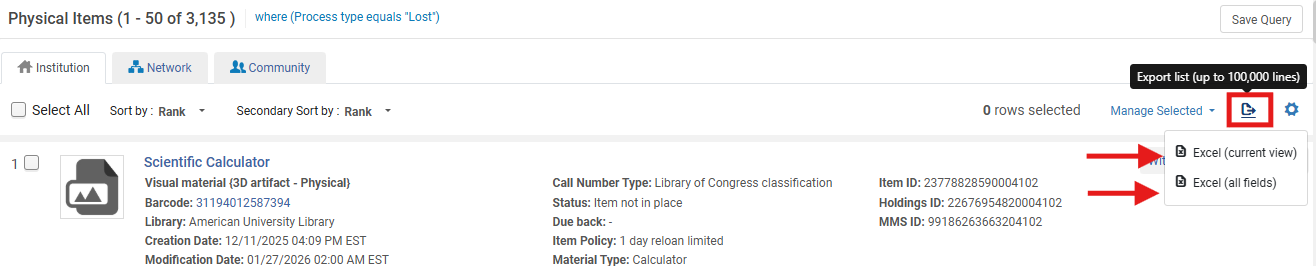
- You can also use the Export icon drop-down menu to download an Excel spreadsheet of the report; Alma provides two options when exporting results to Excel. These options determine how much data is included and how it is structured in the exported file:
- <Excel Current View> Exports only the fields that are currently visible on the screen.
- What this includes:
- Columns displayed in your current results view
- Any column customizations you have applied (for example, reordered or hidden fields)
- A simplified dataset focused on what staff are actively viewing
- When to use this option:
- Quick review or sharing of visible results
- Basic reporting or troubleshooting
- Situations where only key fields are needed
- What this includes:
- <Excel All Fields> Exports a complete dataset for each record, including fields that are not visible in the current view.
- What this includes:
- All available metadata for the record
- Additional system fields not displayed in the UI
- More detailed and comprehensive information
- When to use this option:
- Detailed analysis or auditing
- Situations where hidden or backend data may be needed
- Detailed analysis or auditing
- What this includes:
- <Excel Current View> Exports only the fields that are currently visible on the screen.
What Happens Automatically in Alma: When a Lost item is returned:
-
Alma removes or adjusts the lost item fee (based on configuration)
-
The loan is updated or closed
-
The item is no longer in Lost status
-
The transaction is recorded in the Found Lost Items Report
Frequently Asked Questions
-
Why should I search for lost items regularly?
-
To monitor outstanding materials and support reconciliation, billing, and collection management.
-
-
Do I need to remove fees manually in Alma?
-
Usually no. Alma handles this automatically based on configuration, but external systems may still require action.
-
-
What if an item still appears as lost after being returned?
-
Verify that the item was properly discharged and that the loan status updated correctly.
-
-
How often should the report be reviewed?
-
Follow your library's in-house policies for guidance
-
- Does this report include CLS Lost items?
- No. CLS Lost items can only be provided from the Network Zone. However, you can always submit a WRLC Service Desk ticket to make a request for a CLS NZ Loan Report of your library's patrons.