Fulfillment Unit Overview
Overview of the Alma Fulfillment Unit and its key components—Terms of Use, user groups, item locations, and other lending rules. This section explains how these elements are configured and how they interact to control loan periods, requests, and access within the Alma Fulfillment module.
- Fulfillment Units and Fulfillment Rules
- Fulfillment Configuration Utility
- Physical Locations
- User Groups
- Terms of Use (TOU)
- Item Policies
Fulfillment Units and Fulfillment Rules
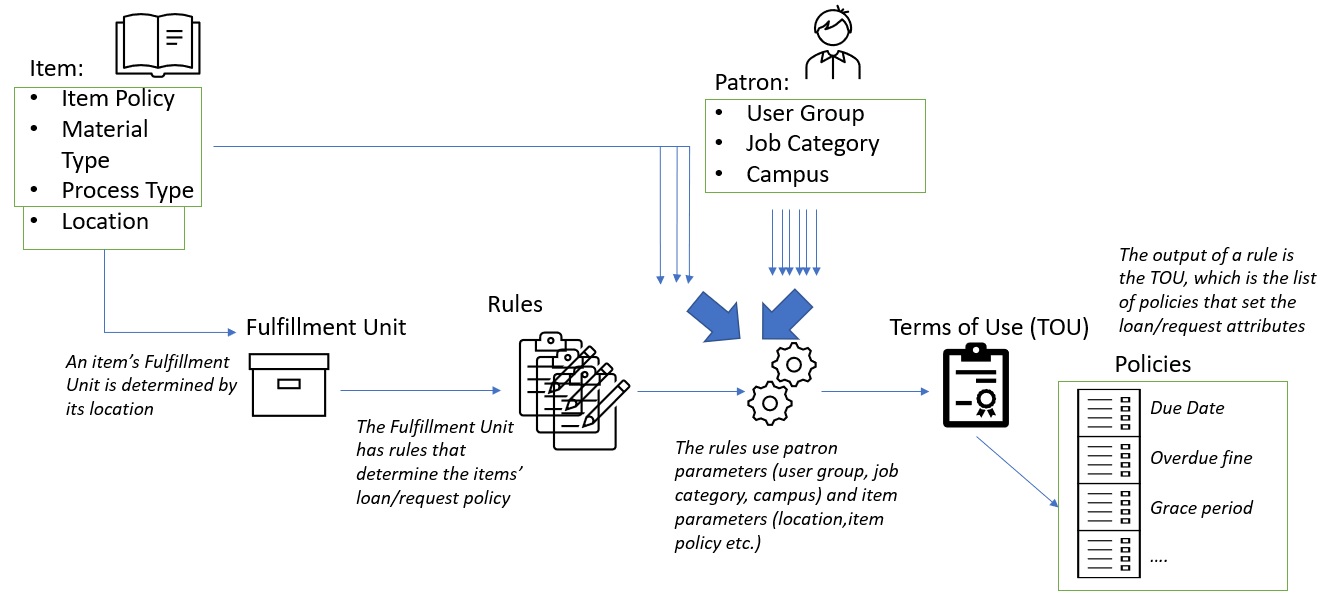
In Alma, the Fulfillment Unit is the fundamental structural component that governs how items circulate within your institution.
A Fulfillment Unit is a logical grouping of one or more physical locations within your institution that all share and apply the same set of circulation policies.
Core Components and Their Roles
The Fulfillment Unit acts as a container for the following essential components, which work together to process circulation transactions:
Network Fulfillment Units (Consortial Environments)
In a consortial (shared) environment utilizing the Alma Network Zone (NZ), a Network Fulfillment Unit is used to manage circulation policies that apply across multiple institutions, such as consortial loan (CLS/AFN) transactions.
-
Function: It is possible for an Institution-only Fulfillment Unit to incorporate rules from a Network Fulfillment Unit (like the 'WRLC Fulfillment Network'). This allows for centralized management of shared policies.
-
Example: In your consortium, the 'WRLC Fulfillment Network' is the single NZ fulfillment unit containing all rules specific to CLS/AFN transactions.
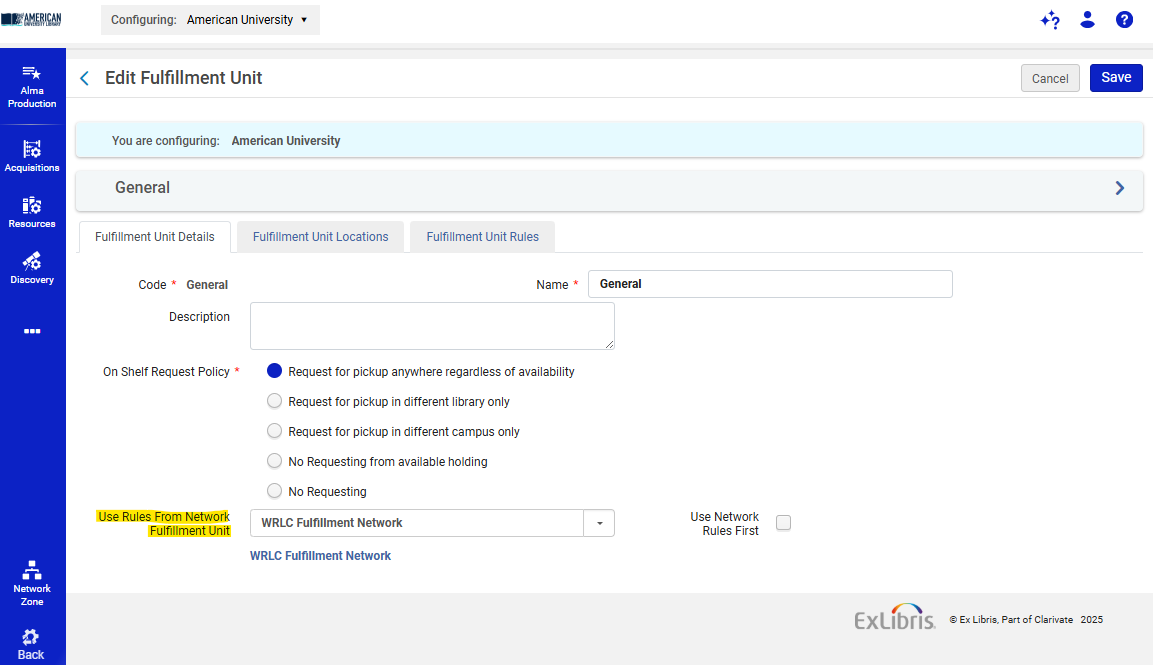
To configure the use of Network Zone rules in a specific Fulfillment Unit, choose the WRLC Fulfillment Network from the drop-down menu in the Fulfillment Unit configuration page, under the option Use Rules From Network Fulfillment Unit. Do not checkmark 'Use Network Rules First.'
For more information on the rules and TOUs in the WRLC Fulfillment Network fulfillment unit, please see the Fulfillment Unit section of the AFN Network Zone Configurations page of the WRLC Alma Wiki.
Configuring a Fulfillment Unit
Fulfillment Units can be found in Configuration > Fulfillment > Physical Fulfillment > Fulfillment Units
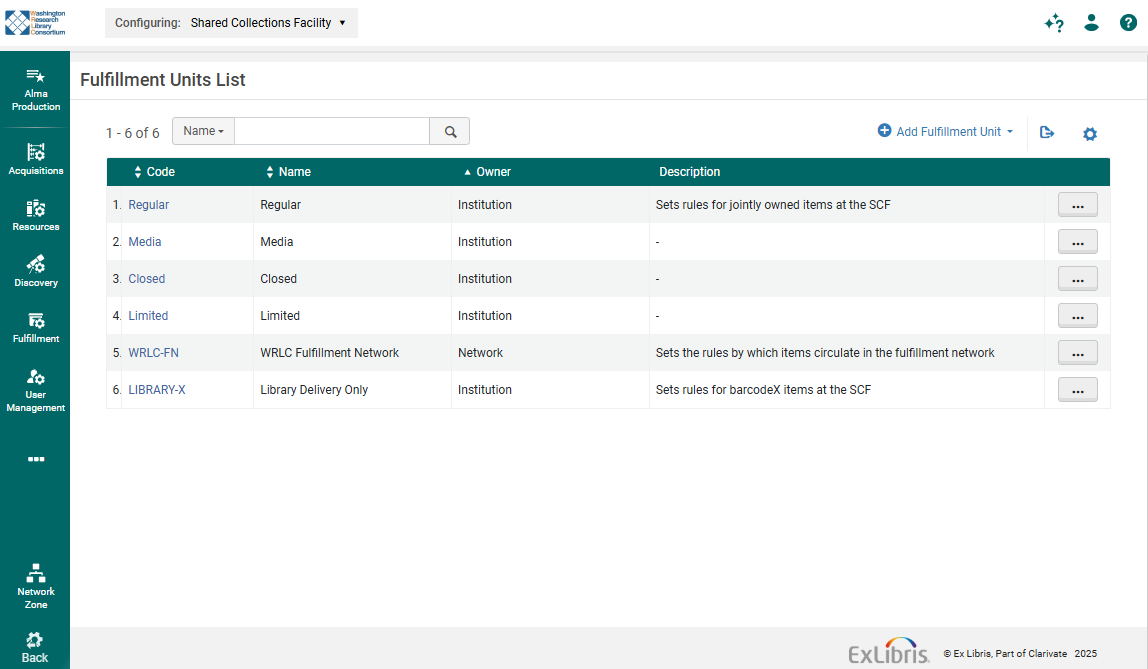
*Please note that Fulfillment Units can be configured for entire institutions, or for specific libraries. Changing the Configuring drop-down menu at the top-left corner of the screen will change your results.
Creating (Adding) a Fulfillment Unit
-
Go to the Fulfillment Units List page.
-
Select Add Fulfillment Unit.
-
In the dialog box, enter a Code (required, max 10 characters) and a Name (required).
-
(Optional) Enter a Description.
-
Select an On shelf request policy to define how items can be requested when they are available on the shelf (e.g., Request for pickup anywhere regardless of availability or No requesting).
-
Select Add Fulfillment Unit to save the new unit.
Fulfillment Unit Details
-
On the Fulfillment Units List page, select the FU's Code or choose Edit from its row actions list.
-
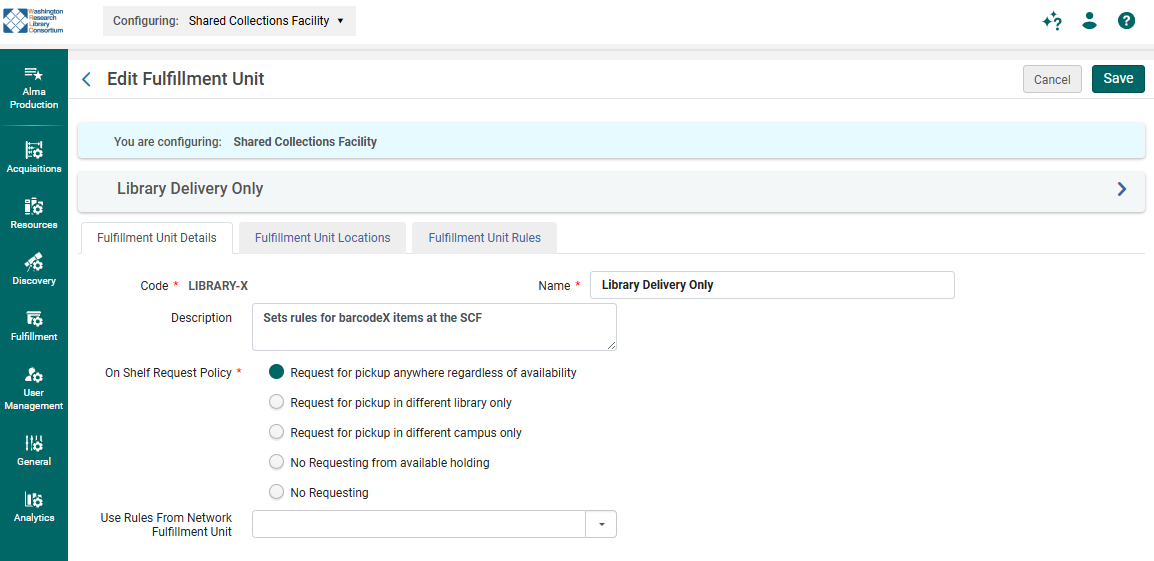
The Edit Fulfillment Unit page appears, defaulting to the Fulfillment Unit Details tab.
-
In this tab, you can modify the general parameters you set during creation: the Code, Name, Description, and the On shelf request policy.
-
Save your changes. (Further configuration, such as associating Locations or defining Rules, is done by selecting the corresponding tabs.)
Fulfillment Unit Locations
-
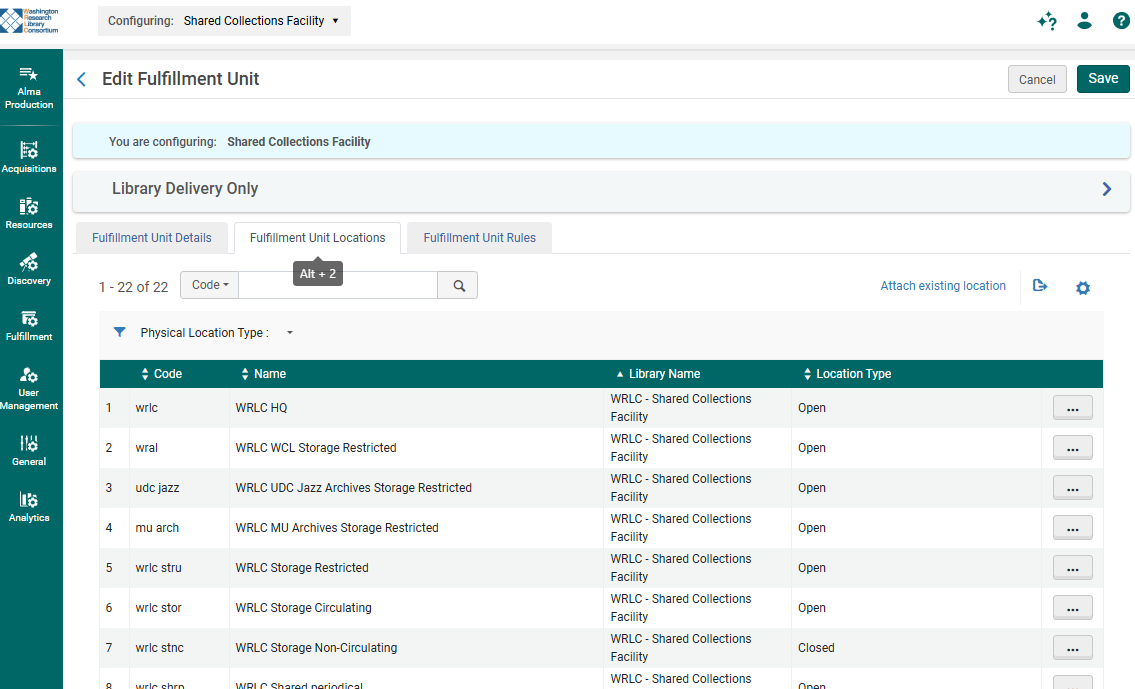
On the Edit Fulfillment Unit page, select the Fulfillment Unit Locations tab.
-
To Attach Existing Location(s):
-
Select Attach Existing Location.
-
The Physical Locations List page appears. Select the location(s) you want to add, then select Select.
-
Note: A location can only be associated with one Fulfillment Unit.
-
-
For more information on how to create physical locations, please see the WRLC Alma Wiki page Physical Locations.
Fulfillment Unit Rules
Fulfillment Unit Rules are the method for attaching Terms of Use (TOU) to a Fulfillment Unit (FU). These rules determine which TOU applies to a specific patron service (Loan, Request, or Booking) based on various criteria.
For more information on how to create TOUs, please see the WRLC Alma Wiki page Terms of Use (TOU).
-
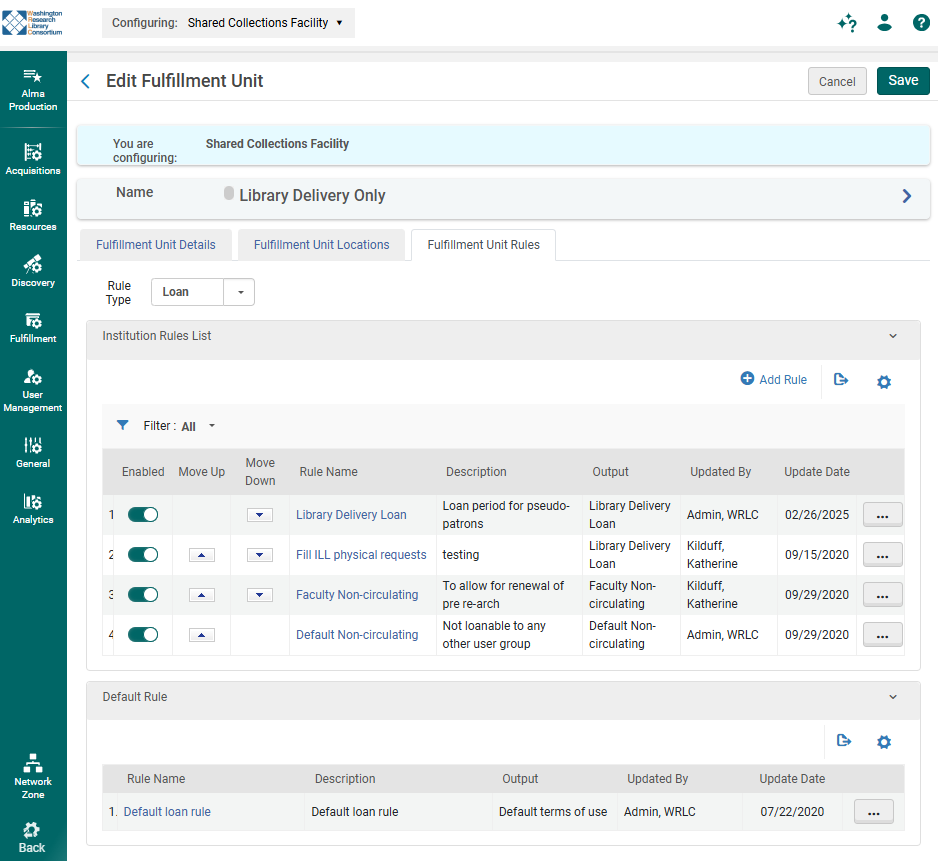
Access Rules Tab: Navigate to the Fulfillment Unit Rules tab within the "Edit Fulfillment Unit" page.
-
Select Rule Type: Choose the type of rule you are configuring: Booking, Loan, or Request.

-
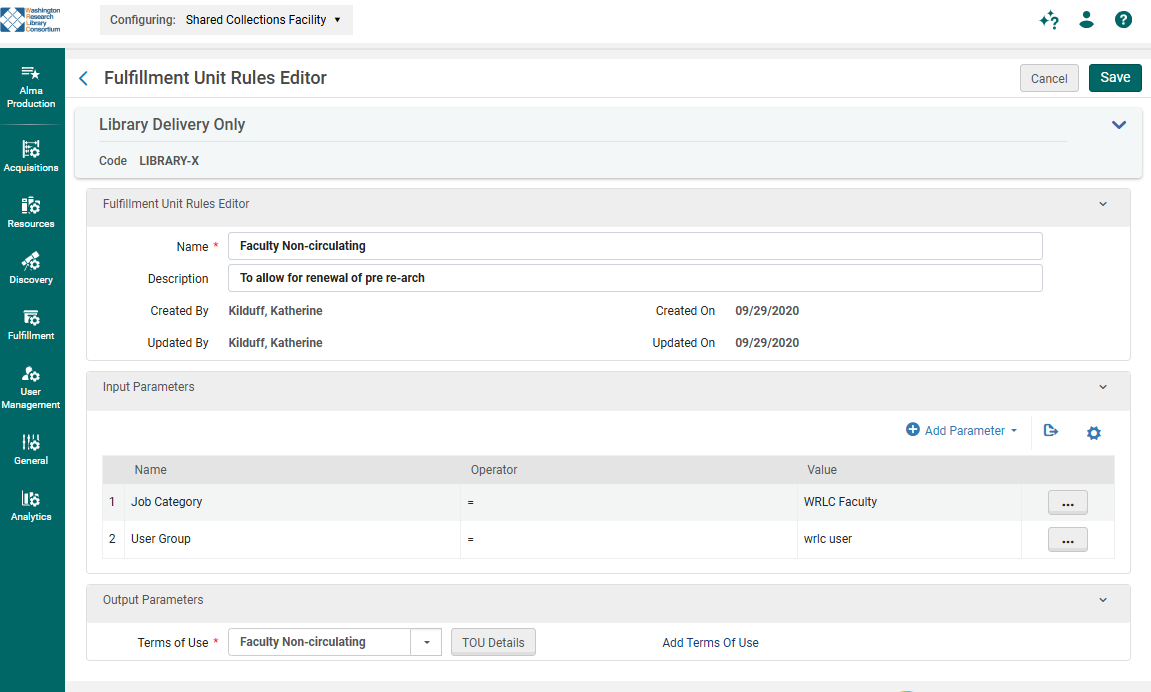
Add a New Rule: Select Add Rule to open the Fulfillment Unit Rules Editor.
-
Define Rule Details: Give the rule a Name (required) and an optional Description.
-
Set Input Parameters: Define the criteria that must be met for the rule to apply by specifying one or more Input Parameters. These are the conditional statements that filter which items or users the rule affects.
-
Components: Each parameter is defined by a Name (the field to check, e.g., Material Type), an Operator (e.g., equals), and a Value (e.g., DVD-ROM).
-
Possible Parameters include:
-
Material Type
-
Patron Affiliated Campus
-
Process Type
-
Location (circulation desk)
-
Job category (user role)
-
-
-
Set Terms of Use (Output Parameter): The rule's output is the Terms of Use (TOU) that will be applied if all the input parameters are met. Select the desired TOU from the Output Parameters section.
-
Save: Select Save to store the new rule.

-
Rule Order: Rules are evaluated from top to bottom. If a rule's input parameters match, its associated Terms of Use is applied, and the system stops evaluating subsequent rules. Therefore, specific rules must be placed before more general rules. You use the up/down arrows to adjust the order.
For more information on how to configure Fulfillment Units, please see the Alma Knowledgebase page Configuring Fulfillment Units.
Understanding the Fulfillment Unit Hierarchy
The process of determining the final circulation policy follows a precise hierarchical order, which includes the evaluation of Network rules:
-
Start with the Location: When a patron attempts a transaction, Alma first identifies the Fulfillment Unit associated with the item’s Physical Location.
-
Determine Transaction Type: Alma immediately filters the relevant policies based on the type of transaction being performed (e.g., Loan, Request, or Booking). This restricts the evaluation to only the Fulfillment Rules associated with that category of Terms of Use.
-
Evaluate Institution Rules: Alma checks the list of Fulfillment Rules configured directly in the Institution-only Fulfillment Unit, evaluating them in their configured order.
-
Evaluate Network Rules: If no Institution Rule is met, Alma proceeds to evaluate the rules within the Network Fulfillment Unit (if one is configured for the Institution's unit). These rules are evaluated in their configured order.
-
Apply Default Rule: If no rule in either the Institution or Network unit is met, the system applies the final Default Rule at the end of the rule list.
-
Apply the TOU: The first Rule whose criteria are met (whether Institution, Network, or Default) will be triggered, and its linked Term of Use (TOU) will be applied to the transaction (e.g., a 3-week loan).
Fulfillment Configuration Utility
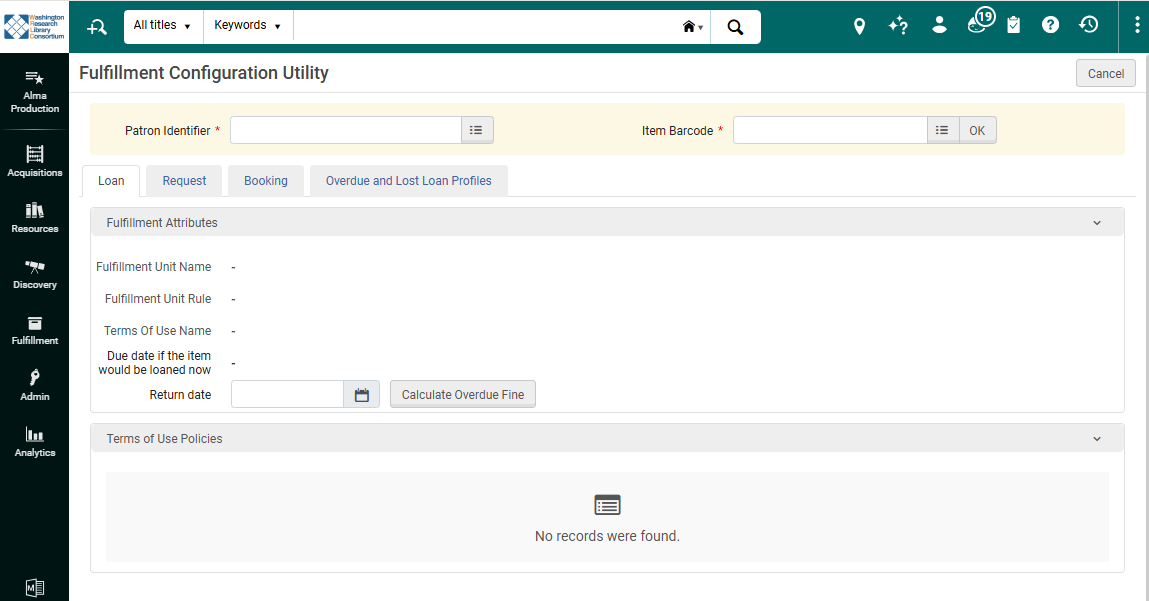
The Fulfillment Configuration Utility, which can be found in Fulfillment > Advanced Tools - Loans > Fulfillment Configuration Utility is an essential diagnostic and testing tool within Alma used by administrators to validate and troubleshoot the circulation rule structure.
-
Purpose: It allows staff to test exactly which Fulfillment Rule and Term of Use (TOU) will be applied for a specific circulation scenario before a live transaction is performed.
-
Function: Users input a specific Patron (User Group) and an Item (Barcode/Location), select the transaction type (Loan, Request, etc.), and the utility immediately displays:
-
The specific Fulfillment Unit applied.
-
The exact Fulfillment Rule that was matched.
-
The resulting Terms of Use (TOU), including the calculated loan due date or request policy details.
-
-
Benefit: This utility is invaluable for verifying new configurations, troubleshooting reported policy discrepancies, and ensuring that the complex rules engine is functioning as intended.
Physical Locations
Physical locations in Alma are the essential infrastructure for managing physical inventory. A physical location is always associated with a library (not the institution) and dictates the default policies and workflows for the items housed there.
For more information on how to associate physical locations with Fulfillment Units, please see the WRLC Alma Wiki page Fulfillment Units and Fulfillment Rules.
Adding a new Physical Location
- Go to Configuration Menu > Fulfillment > Locations > Physical Locations. Ensure you are configuring within the context of the specific library you are working with by using the Configuring filter on the Configuration page.
-
On the Physical Locations List page, select Add Location.
-
Enter Basic Details:
-
Enter a unique Location Code (up to 10 characters, no commas) and Name (both required).
-
(Optional) Enter an External Location Name—this is the name displayed to patrons in the discovery interface (e.g., Primo).
-
-
Define Location Type: From the Type list, select the appropriate location type:
-
Open: Accessible by patrons for self-retrieval/checkout.
-
Closed: Accessible by library staff only.
-
Remote Storage: Similar to Closed, but located off-site.
-
Unavailable: Items are considered unavailable for electronic services calculation.
-
Not in Library: For copies currently held by an instructor (e.g., course reserves).
-
-
Assign Fulfillment Unit: From the Fulfillment unit list, select the unit that will govern the policy rules for items in this location.
-
Define Call Number Type: From the Call number type list, select the classification system used for holdings in this location (e.g., Library of Congress, Dewey Decimal).
-
Add Map URL (Optional): Specify the URL of a map to help patrons find the location.
-
Finalize Creation: Select Add Location to save the new location.
-
Post-Creation (Recommended): After adding, you must Edit the location (or the relevant circulation desk) to attach it to one or more Circulation Desks so that staff can handle items (e.g., check-in, check-out, reshelving) for that location.
Editing a Physical Location
-
On the Physical Locations List page, select Edit from the row actions list for the desired location.
-
Update Details: Edit the location details (Code, Name, Type, Fulfillment Unit, etc.) as needed in the Physical Location Details section.
-
Manage Circulation Desks: In the Physical Location Circulation Desks List section, attach existing or new circulation desks and define the services they provide for this location.
-
Configure Holdings: In the Holdings Configurations section:
-
Set the Accession placement (MARC subfield) for accession numbers.
-
Select Suppress from discovery to hide items in this location from the patron interface.
-
(Optional) Set the Discovery Priority for controlling the display order in Primo.
-
-
Save Changes: Select Save to store the updates.
Associating Locations with Fulfillment Units
Physical locations are associated with specific Fulfillment Units. This is how circulation policies are assigned to locations.
For instructions on how to associate locations with Fulfillment Units, please see the WRLC Alma wiki page Fulfillment Unit Locations.
Adding a new SCF Remote Storage Location
Please open a ticket with WRLC (servicedesk@wrlc.org) in order to create a new SCF location in your Institution Zone.
User Groups
To configure user groups, you generally need the User Administrator or General System Administrator role. The process involves two main steps:
Defining the User Groups
Mapping User Groups to User Record Types
After defining the groups, you must specify which User Record Types (Staff, Public, or Contact) can be associated with each group.
Once configured, the user groups can be assigned to users when adding or editing their profiles, which may automatically trigger the application of role profiles or user registration terms if you've set up role assignment and registration rules.
Associating User Groups with TOUs
User groups can be associated with specific Terms of Use (TOUs) within your Fulfillment Unit Rules. This is how circulation policies are assigned to specific types of users.
The association takes place within a Fulfillment Unit's rule table, which dictates which TOU is applied to a transaction based on both the type of transaction (request, loan, etc.) and a set of criteria (fulfillment rules).
For instructions on how to create Fulfillment Rules, please see the WRLC Alma wiki page Fulfillment Unit Rules.
Terms of Use (TOU)
A Terms of Use is a bundle of specific fulfillment policies (such as loan periods, fine structures, and renewal options) that are applied to items, patrons, or services within a library.
-
TOUs are attached to Fulfillment Unit Rules to determine the policies applied when a patron requests a service (e.g., a Loan, Request, or Booking).
-
Any changes made to a policy within a TOU are immediately applied wherever that TOU is in use.
For more information on TOUs, please see Alma Knowledgebase page Configuring Terms of Use.
Configuring Terms of Use
-
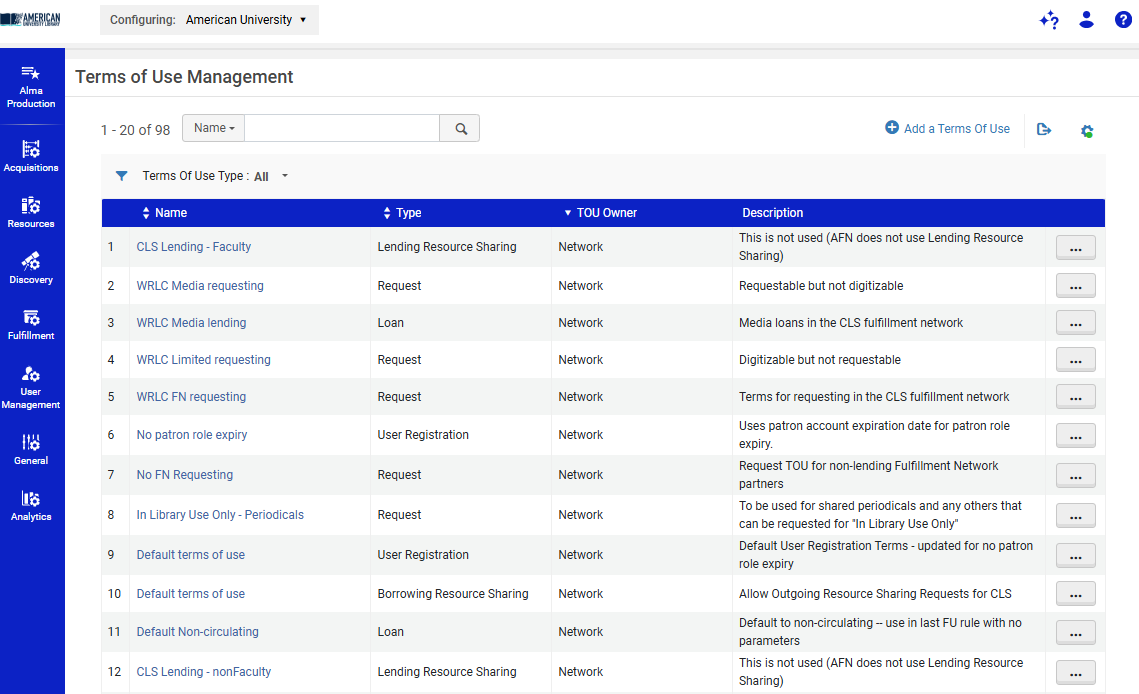
Navigate to the Terms of Use Management page (Configuration Menu > Fulfillment > Physical Fulfillment > Terms of Use and Policies).

-
Select Add Set of Terms of Use to start the configuration wizard.
-
Step 1: General Information
-
Enter a Name (required) and an optional Description.
-
Select the Type (e.g., Loan, Request, Booking, or Resource Sharing).
-
Select Next.
-
-
Step 2: Policies
-
This page lists all the policies that will be included in this TOU (e.g., Loan Policy, Fine Policy, Request Policy).
-
Select a policy from the drop-down list for each policy type.
-
To create a new policy, select Add from the row actions list.
-
To edit an existing policy (which will change it everywhere it's used), select Edit.
-
Select Next.
-
-
Step 3: Review
-
Review the details of the new TOU set.
-
Select Save to finalize and add the new Terms of Use to the list.
-
Viewing Related Fulfillment Rules
You can easily see which Fulfillment Unit Rules are using a specific TOU:
-
On the Terms of Use Management page, select Show Related Fulfillment Rules from the row actions list for a specific TOU.
-
The resulting page displays all the rules that currently employ that Terms of Use.
Using TOUs in Fulfillment Units
TOUs are attached to specific Fulfillment Units via Fulfillment Rules. Each Fulfillment Rule uses one TOU, and the rules determine when the specific TOU is applied to a transaction.
For instructions on how to associate TOUs with specific Fulfillment Rules, please see the WRLC Alma wiki page Fulfillment Unit Rules.
Configuring Maximum Renewal TOU
NOTE: To maintain compliance with WRLC Alma Fulfillment Network (AFN) Lending agreed practices, the FN Lending Terms of Use (TOU) Maximum Renewal Period policy must be configured as outlined below.
- Standard wrlc users receive a 42-day initial loan period with up to 3 additional 42-day renewals, resulting in a total allowable loan period of 168 days.
- Patrons assigned the WRLC Faculty Job Category receive fixed semester loan periods (1/31/YYYY, 5/31/YYYY, and 9/30/YYYY) with a total allowable loan period of 16 months, including renewals.
The Maximum Renewal Period policy defines the total amount of time a patron may retain a loaned item beginning from the original loan date, including all renewals.
Per ExLibris documentation, "Alma doesn't count the number of renewals for a loan. Renewal limits are managed by the 'Maximum Renewal Period' policy in the Loan Terms of Use (TOU) which indicates the total period of time that a user may have the loaned item." (ExLibris: Loan doesn't renew as expected in Alma)
Example: WRLC FN Lending Maximum Renewal Period configurations:
- Students:
- 42-day initial loan period plus 3 renewals
- Configure Maximum Renewal Period = 168 Days
- 42-day initial loan period plus 3 renewals
- Faculty/Instructors:
- 1 year total loan period including renewals
- Configure Maximum Renewal Period = 16 months
- 1 year total loan period including renewals
If the desired Maximum Renewal Period policy is already available within the Terms of Use (TOU), you may select and update the existing policy as needed; skip ahead to Step #4
1. If the policy is not available, first create a new policy through: Configuration > Fulfillment > Physical Fulfillment > Advanced Policy Configuration> Add Fulfillment Policy
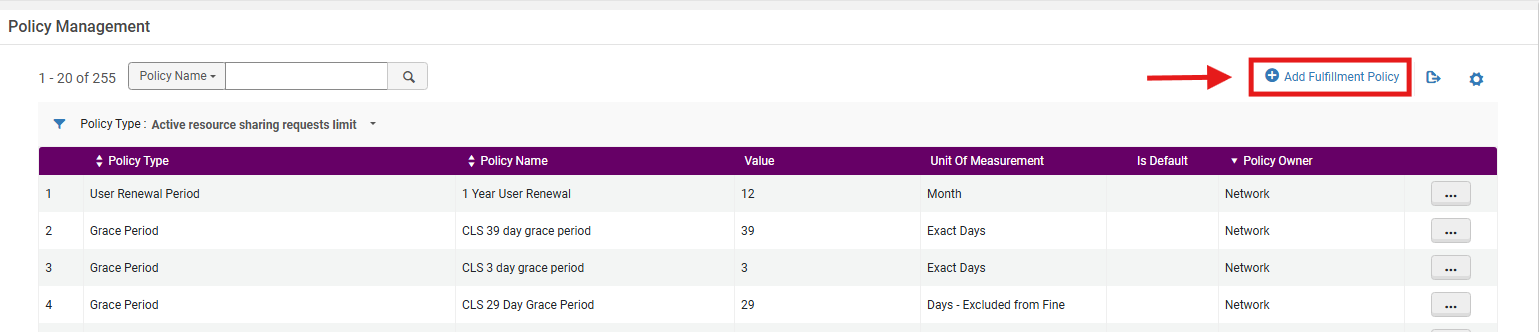
2. From the Select Fulfillment Policy Type list, locate and select the desired policy> Maximum Renewal Period; select Next

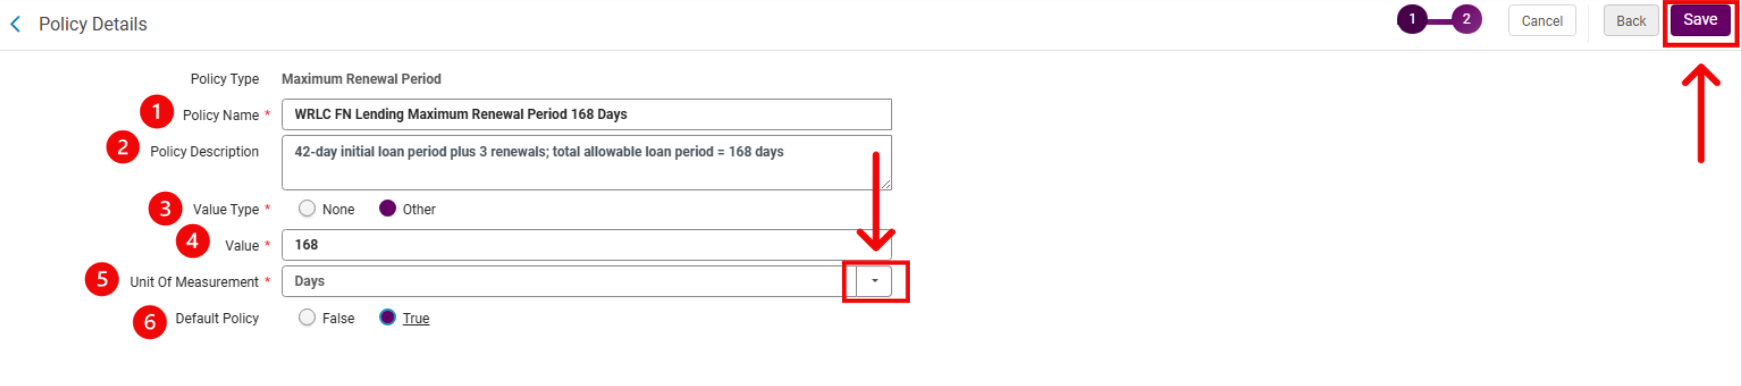
3. In the Policy Details page, complete the policy form to configure the new policy's values:
- Enter a Policy Name, for example:
- WRLC FN Lending Maximum Renewal Period 168 Days
- WRLC Faculty Lending Maximum Renewal Period 16 months
- Enter a Policy Description, for example:
- 42-day initial loan period plus 3 renewals; total allowable loan period = 168 days
- 1 year total allowable loan period including renewals
- 42-day initial loan period plus 3 renewals; total allowable loan period = 168 days
- From the Value Type drop-down menu, select Other
- Selecting Other enables the fields required to configure the policy duration and unit of measurement.
- In the Value field, enter the desired total loan duration
- From the Unit of Measurement drop-down menu, select the appropriate unit: Days
- Set Default Policy according to local library policy
- Select True if this policy should be the default option for this policy type
- Select False if this policy should only be available for selection when needed
- Select Save

4. Open the desired Terms of Use (TOU) Navigate to: Configuration> Fulfillment> Physical Fulfillment> Terms of Use and Policies
- Set <Terms of Use Type> to Loan
- Locate the desired TOU; in this example it is WRLC FN Lending, your library may use a different TOU title
- From the action row menu, select Edit
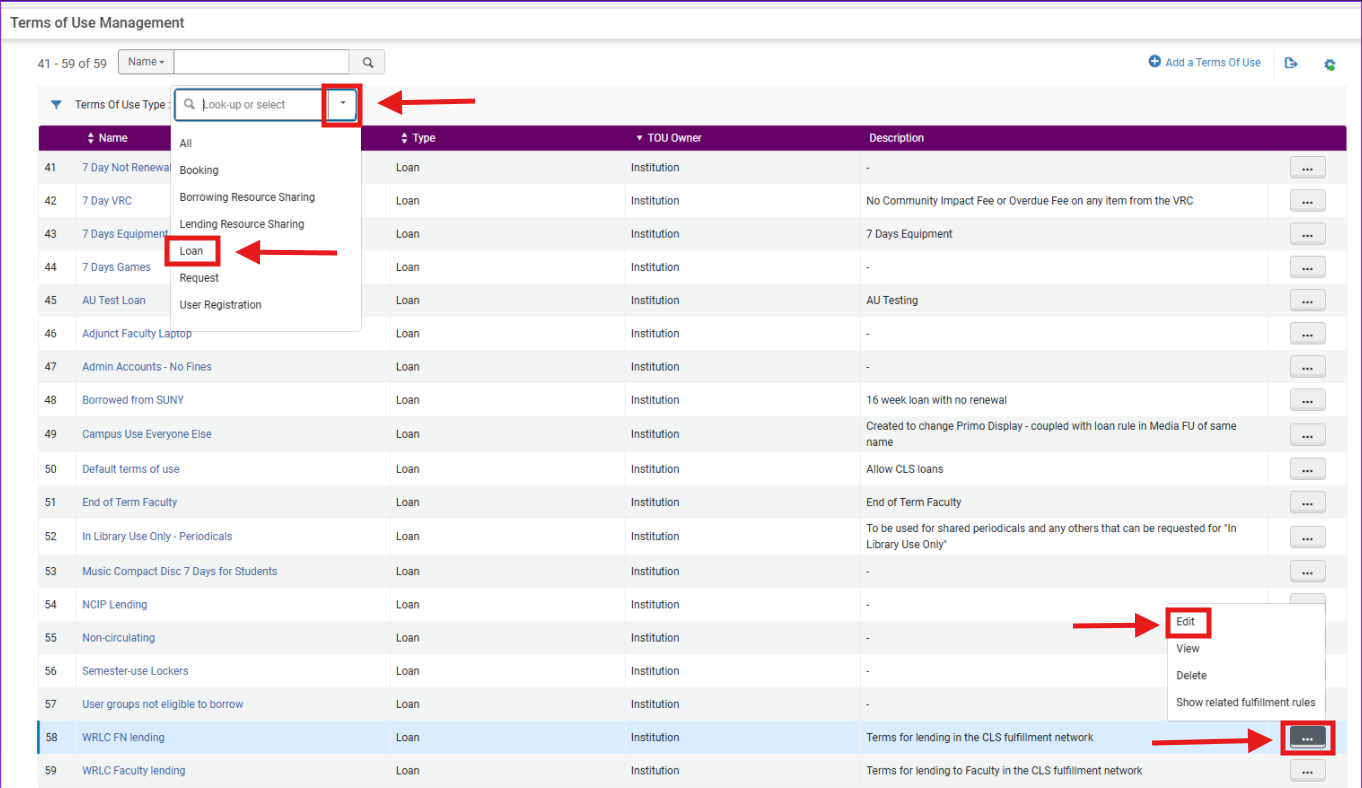
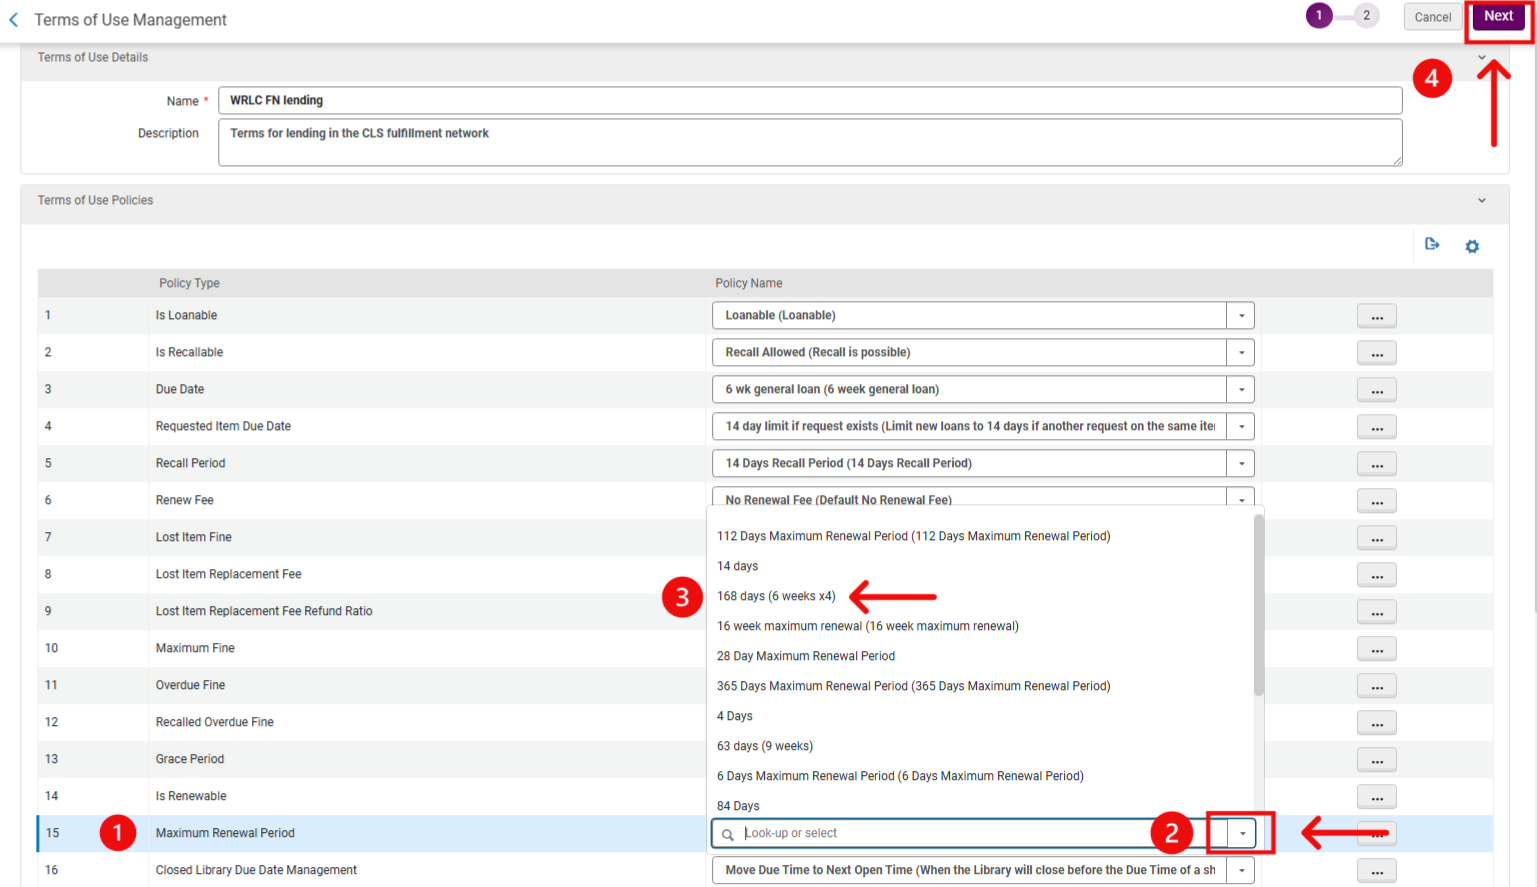
5. Update the Maximum Renewal Period policy from the <Terms of Use Policies> menu:
- From the Terms of Use Management page, locate Policy Type: Maximum Renewal Period
- Use the TOU's policy's drop-down menu to select the desired policy; here the policy example is <168 days (6 weeks old) but your library may have a different policy name
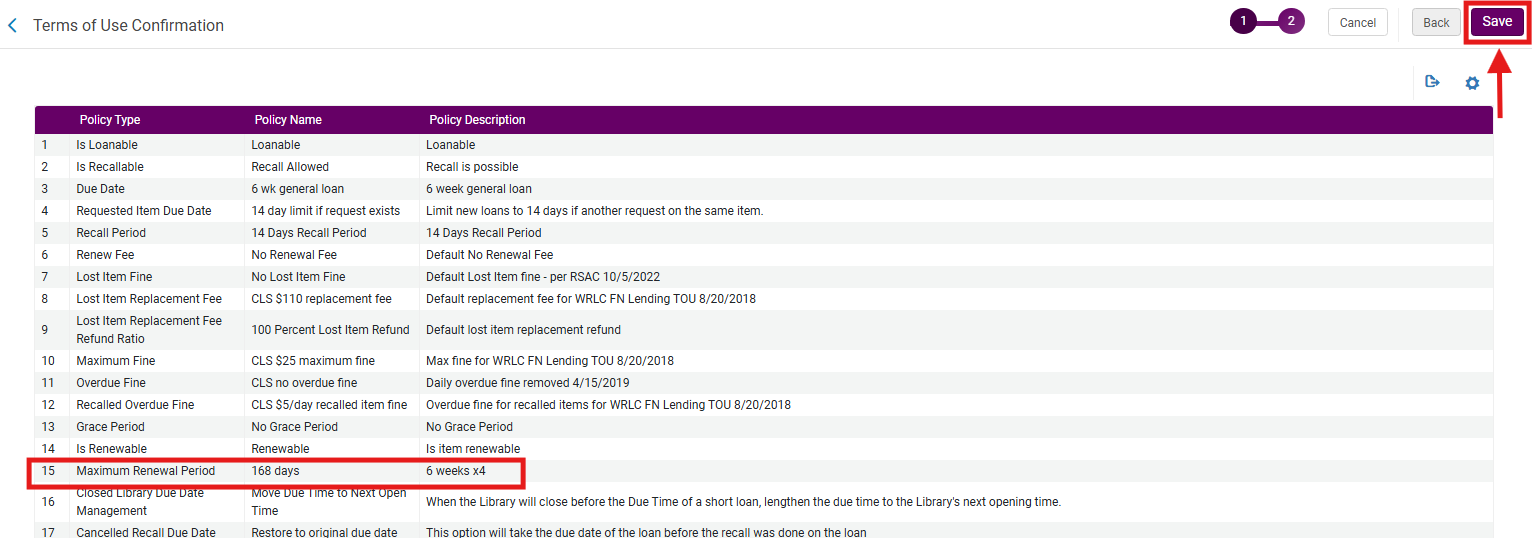
6. On the resulting Terms of Use Confirmation page, locate the Maximum Renewal Period policy from the menu to confirm it has updated to the desired policy; select Save
Item Policies
Alma item policies are a tool used in the Alma Fulfillment module to create exception rules that override the standard circulation rules for specific items.
Configuring Item Policies
Item policies are configured via a Code Table at the institutional level. These steps define the policy codes that will later be used in the Fulfillment Rules engine.
Associating Item Policies with Terms of Use (TOU)
The item policies you define in the code table are activated by linking them to specific Terms of Use (TOUs) within your Fulfillment Unit Rules. This is how an item policy creates its exception.
The association takes place within a Fulfillment Unit's rule table, which dictates which TOU is applied to a transaction based on a set of criteria.
For instructions on how to create Fulfillment Rules, please see the WRLC Alma wiki page Fulfillment Unit Rules.
Applying Item Policies to Item Records
The Item Policy acts as a flag on an item record that, when matched in a Fulfillment Rule, triggers an exception to the standard circulation rules by applying a specialized Terms of Use.
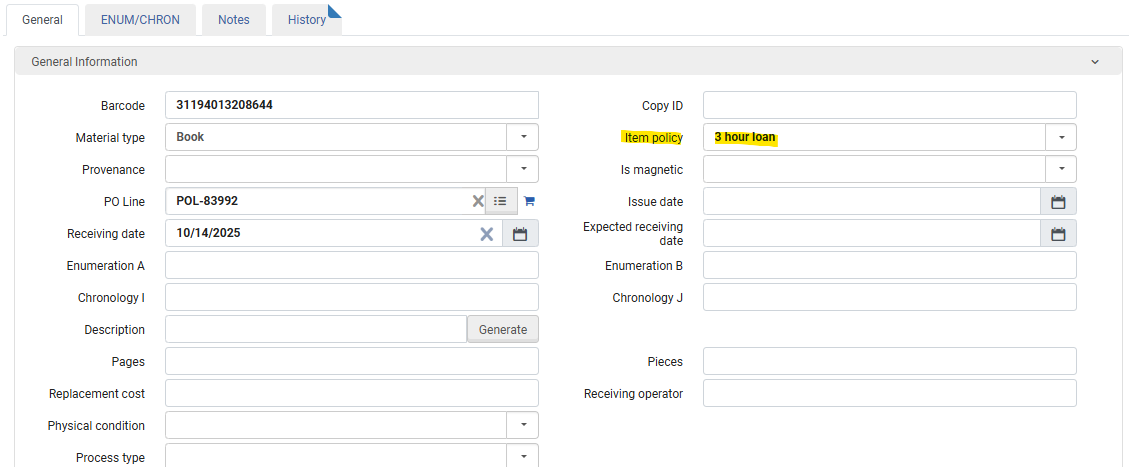
Item policies are added in the item record, in a drop down menu under the General tab.